1- What is Wood?
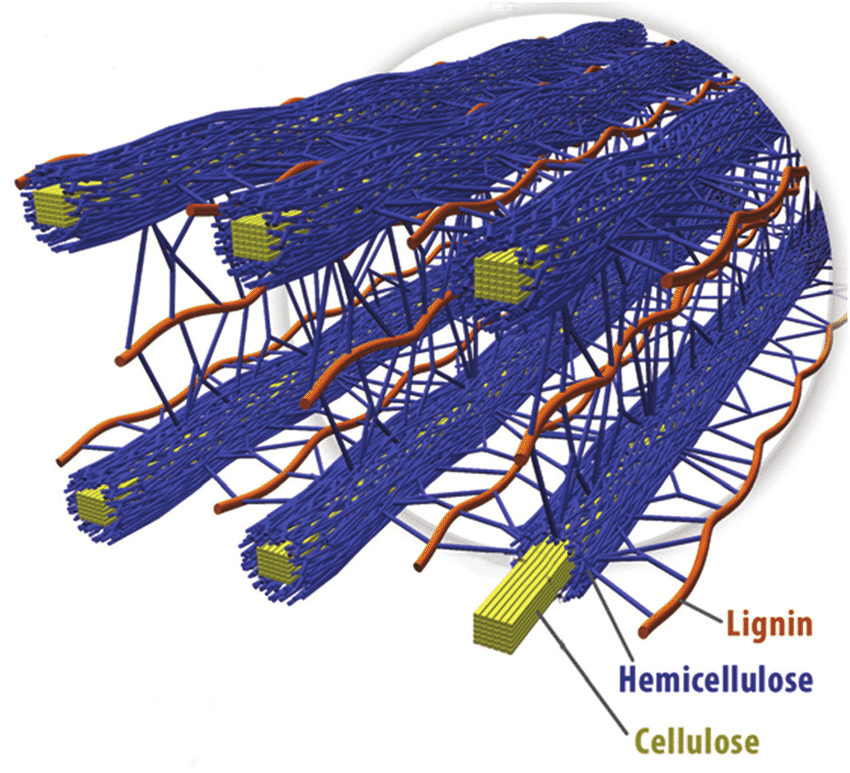
In order to better understand wood sawing and drying methods, we must first understand what wood is and how it behaves on a structural level. Wood is an excellent raw material with good mechanical properties, as well as being easy to machine or process. It is made up of cellulose fibers, hemicellulose, and lignin.
Hemicellulose covers the cellulose fibers, and lignin is the adhesive that holds the fibers together, giving plants structural integrity. Wood also contains other substances such as sugars, resins, oils or starch.
During a tree’s growth process, rings form in its trunk, and each ring represents a year in a tree’s life. If a tree grows in wet, fertile land, it will grow faster. Conversely, in a dry area, it will grow more slowly. This may change the appearance and hardness of the wood, even among trees of the same species. Slow growing trees have rings which are closer together and yield harder wood.
If a tree lives long enough, it can go through several climatic periods which will affect its growth. As a result, some of the rings in a trunk may be more compact than others. Dendrochronology is a science that measures the age of trees based on the growth patterns of their rings, and for many years it has been used to find out about the evolution of climate in ancient times.

A- The tree’s life starts in a forest somewhere in the planet.
B- The annual rings are far apart, the tree is growing in a favorable climate.
C- Elliptical rings, for 10 years the tree has been growing on a slope or swept by constant strong wind.
D- Narrow or compact rings, due to a few years of dry weather or because a bigger tree is stealing sunlight and nutrients from it.
E- The rings are, once again, far apart. The weather has improved or the tree that was stealing its nutrients has been cut down.
F- A sign of a small fire when the tree was 28 years old.
G- Once again, compact rings. Judging by the size of the tree at that point, it must have been caused by a few years of drought, rather than a tree stealing its nutrients.
H- Continuous slow growth. Either due to persistent drought or an insect infestation.
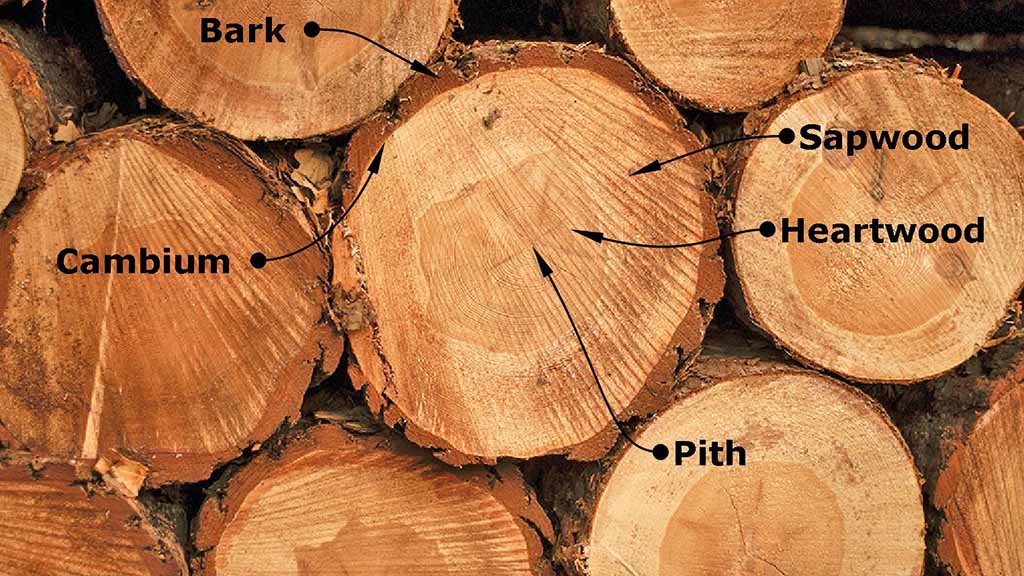
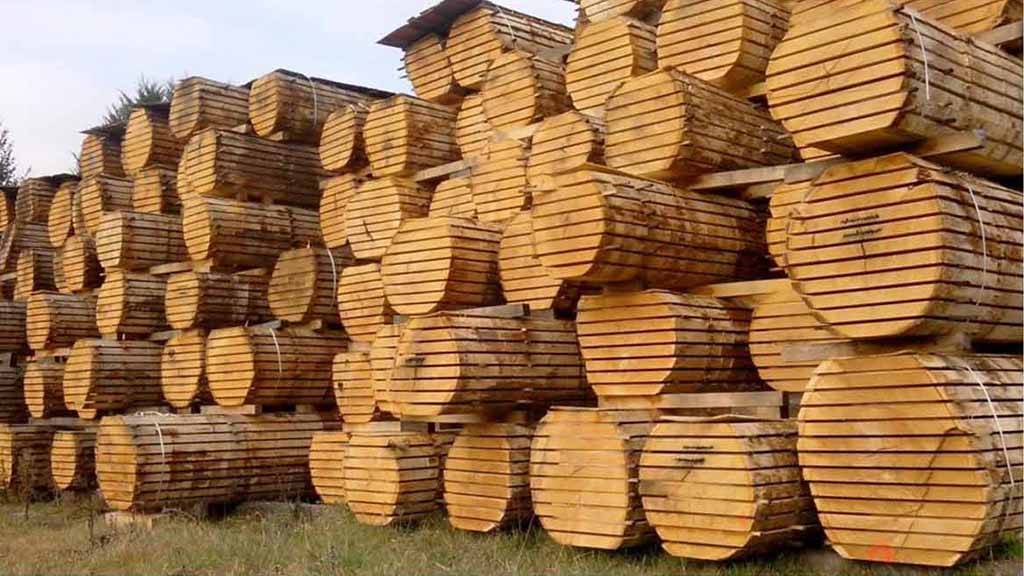
In this cross-section, we can see the parts of a log:
1- Bark:
Bark is made up of dead cells and is the outermost layer, shielding the tree from external aggressions. It also protects the inner bark, the cambium.
2- Cambium:
It is a thin layer, underneath the bark, which allows the tree to grow, creating new cells every year. Over the months it becomes sapwood.
3- Sapwood:
Sapwood brings nutrients from the roots to the leaves. It is the most recently formed wood. Over the years, its cells die and sapwood becomes heartwood. It is not the best wood to work with.
4- Heartwood:
Harder and drier than sapwood, heartwood is also generally darker. As mentioned earlier, heartwood is what sapwood turns into after its cells die or “heal.” Heartwood is the best raw material of a tree.
5- Pith:
The darkest part of the trunk, at its centre, measuring only a few millimetres in diameter. Like sapwood, it transports essential nutrients to the tree.
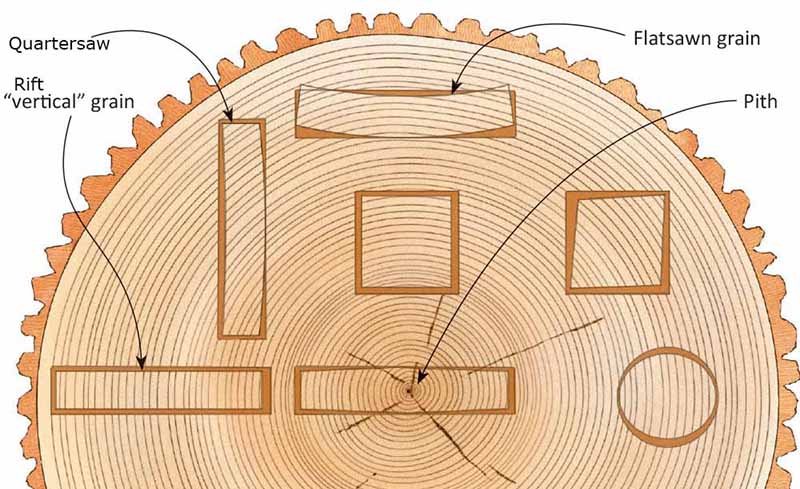
2- Cutting Methods:

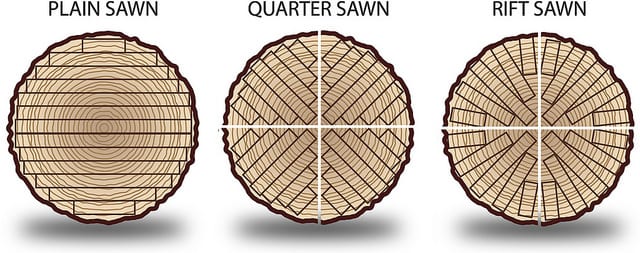

Although there are more ways to divide a log into smaller pieces to make it easier to work with wood, these are the three main types of log cuts and their descriptions.
1- Plain-Sawn:
This is the most common cut for several reasons. It is the cheapest, it wastes less material and saves work time, as sawmills need not turn the log to make additional cuts. This cut also allows for a more aesthetically pleasing and colorful pattern. Highly used in all kinds of woodworking.
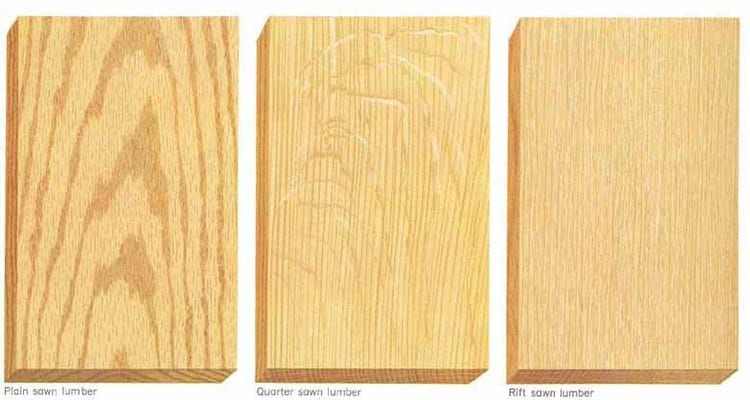
2- Quarter-Sawn:
Slightly more expensive than plain-sawn lumber, as the log needs to be turned a few times. It has straighter grain, with parallel lines. Depending on the type of wood and due to medullary rays, the wood can have tiger marks, as seen in the image, which are highly appreciated by woodworkers in many countries. Another interesting feature of this kind of cut is that it yields wood which is less porous, and by cutting almost perpendicularly to growth rings, we obtain lumber and planks that are more stable than their plain-sawn counterparts.
3- Rift-Sawn:
The least common and most expensive type of cut. It wastes a considerable amount of wood and requires more complex cutting work at the sawmill. This is the price to pay in order to obtain a cut that is perfectly perpendicular to the growth rings in all pieces. This method produces very stable lumber, with straight fibers that are parallel to one another. The wood is also less porous. Very often used in designer furniture, where the cabinetmaker aims to produce a piece of furniture with straight lines or which calls for highly stable structural pieces. It is also widely used in the manufacturing of musical instruments.

Source: andertons.co.uk. For example, it is often used for acoustic guitar soundboards. You may have seen one these guitar tops with all those parallel and compact grain lines, such as the one above, made with cedar wood. It allows for more uniform sound and longer sustain, as well as providing a more stable construction in general.
Someone asked me once why the wood used for making musical instruments was more expensive. One type of wood can be more expensive for various reasons, such as the origin of the tree, whether it is slow growing, etc. But considering we are discussing wood itself, this could be one of the reasons. A log yields few pieces free of stains or warping or with correctly cut grain which are suitable to make musical instruments. Moreover, there is the fact that the drying process is better.

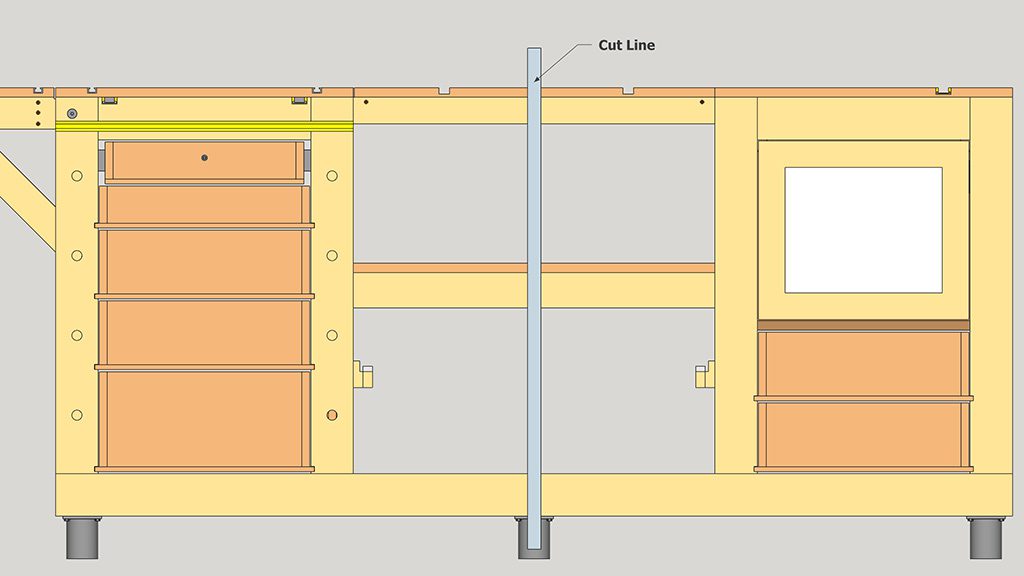
Once we have learned all the different types of cuts, what would you say if I told you that even plain sawing can produce the pieces we obtained by quarter sawing? To begin with, in the above graph where I show the three kinds of cuts, we can see that the center of the plain-sawn piece has grain lines that are almost perpendicular, although one would be lucky to stumble upon one of these in a carpentry store.
If the log was of a considerable diameter and the lumber is thick enough, you may obtain quarter-sawn pieces with almost perpendicular grain lines in other boards from that trunk, although these pieces would of course be smaller.
That is the case of the piece of maple lumber above. I came across it in a nearby carpentry shop. After noticing the grain on its end and seeing that it had no flaws at first glance, I did not hesitate to buy it. It is easy to see that it came from a sizable tree, as the log was plain-sawn, but because it is so wide, it produced smaller pieces with grain lines that are almost perpendicular, as if quarter-sawn, such as the pieces I marked on the end of the plank. I have already made four guitar necks from this plank.

This is one of the necks I made from the maple lumber. As you can see, the grain is almost perpendicular on the end(edge) of the headstock, enough for the neck to support the tension of the strings more efficiently and prevent warping or torsion.
3- Storage and Dryin:
Almost half the weight of lumber is water at the time of cutting it. This is divided into free water and bound or hygroscopic water. Free water circulates nutrients when the tree is growing and evaporates easily when the tree has been cut down. This barely changes the structure of the wood.
Bound water is attached to the cellulose fibers of the tree and is much more difficult to remove. When bound water begins to evaporate, the wood begins to decay or “shift,” and this is where problems like torsion or honeycombing can pop up. That is why it’s important to dry the wood properly before using it in our projects. There are two main ways to dry lumber:
Air Drying:
Once the tree has been cut down, it is advisable to divide it into boards as quickly as possible. Dividing the log will prevent rotting and fungal attacks. It’s important to remove the bark so that the wood can lose moisture more easily.
Source: gaudelas.com. As a rule of thumb, it takes a year for every 20mm of thickness. So, if we want to dry a 50mm thick plank, it will take 2.5 years. It’s best to find a well-ventilated place in the shade, avoiding direct sunlight. The wind will help it dry better and more quickly. These variables can reduce the drying time.
We must seal the ends of the planks. Wood loses moisture 10 times faster from this part of the plank. Sealing the ends will allow the plank to lose humidity in a more uniform way. Otherwise, the outer parts of the plank will release more humidity and shrink faster than the center of the plank, causing cracks or honeycombing. Any varnish or product that seals the pores will do.
Look for perfectly level ground, leaving a gap between the floor and the wood. If we stack the planks on uneven ground, over the months the wood will change shape as it releases moisture and due to the weight. It’s also necessary to leave a gap between the planks to allow air to circulate and for moisture to be released uniformly from all sides. The combined weight of all the planks will prevent the wood from warping due to uneven drying.
Dry wood shrinks in size. If you are going to cut a log for a project in particular, you must always cut it a little bigger. At the end, and just before starting a new project, you can store the planks in a warm room for a few days, especially during the humid summer months, in order to achieve the optimal moisture in the wood.
Kiln Drying:
Most of the wood you can buy nowadays in carpentry stores has been dried in kilns or drying chambers. These offer many advantages compared to air drying and only one disadvantage, a higher energy expenditure.

A kiln allows you to instantly and automatically control all of the variables I discussed above, when I described air drying. You can practically set the amount of moisture the wood gives off in real time and adapt it to all kinds of wood. It eliminates parasites from the wood and prevents them from spreading through a thermal treatment. Also reduces the decay of the wood and prevents fungal attacks and staining. It also saves a lot of time, of course.
They don’t work much differently from a kitchen oven. Heat is produced with electricity, diesel or heat pumps, and is distributed as needed through ventilators. These chambers are also used to vaporize or treat the wood thermally. The planks are stacked and spaced just like when air drying.
After buying planks in a carpentry store, you must follow the same steps to store them in a workshop, even if they have been kiln-dried before. As I said earlier, wood is hygroscopic and will continue to absorb and give off humidity according to the conditions in the workshop and the time of year. You must find a level floor, leave a gap between the floor and the wood and also between planks.

There are reasonably cheap wood moisture meters which are very useful to check the levels of humidity in our wood before using it. The moisture content of the wood must be between 8 and 10%, although a slightly higher level can be acceptable in some projects.
If the planks have more moisture, they can be stored in an artificially heated room, or even with a dehumidifier, until the moisture is low enough.
4- Why Wood Warps?

Besides hygroscopic, wood is an anisotropic material, formed by different tissues such as cellulose and hemicellulose, each with their own features and functions, which cause the structure to not be homogenous depending on the direction of the cut in the plan in question.
This means that the wood will tend to grow or shrink depending on its water content in one direction more than another.
Tangential direction: As you can see above, this is the direction of the wood’s rings, and is also the one with the greatest difference in percentage. Depending on the age of the tree and its species, it can vary its size between 8 and 12%.
Radial direction: This direction cuts through the wood’s rings. It can change between 4 and 6% in size.
Longitudinal direction: This is the direction that is affected the least by a change in water content, only 0.01% approx.
Another good way of visualizing this effect in our minds, even though it’s not really what’s happening, is to imagine that the above wooden block is made of toothpicks. The block is about 5cm tangentially, 5cm radially and as long as the toothpick itself.
Keeping in mind that toothpicks have a very small diameter and are barely affected by the direction of the cut, all toothpicks will change their size in the same way as they absorb or give off moisture. This means that the block of toothpicks will barely shrink by 0.01% lengthwise, but in the other directions we must multiply the small variation in each toothpick by the number of toothpicks in the radial and tangential directions.
This is a good example because, as I said before, you could say that wood fibers are like each of those toothpicks. But due to the structural difference and the loss or absorption of water between cellulose, hemicellulose and lignin, even if they’re the same size, the block of wood will grow or shrink more tangentially than radially.
Source: woodcraft.com. You could say that this picture is a graphic summary of everything discussed in this article, and by studying it we can state the following:
1– Depending on where in the log the board comes from, its end grain and face grain will look different.
2– If we look at the grain on any board, we can more or less guess what part of the log it’s been cut from.
3– This image also show that, according to the source of the cut, the planks will bend in a predictable direction when absorbing and exhaling water. As you can imagine, this is due to what I said earlier. When drying, wood will shrink in all directions, but due to it being an anisotropic material, it will tend to shrink more tangentially (the direction of the rings) than radially, as seen in the image.
Even though we already know the real reason for wood to warp like this, in order to visualize it better in our minds when we are buying a plank and want to know how it will behave, we could say that the wood rings always try to flatten themselves as the wood is drying.
As I explained, and as illustrated by this image, this barely happens when the grain is perpendicular, in rift-sawn wood. As I also said, this can be controlled by drying the wood correctly, although this is not 100% effective and will continue to happen, to a lesser degree, even after our projects are completed.

I’m sure that now you can see something in this maple plank that you couldn’t before. That’s right, it’s a little cupped. Its rings are trying to flatten themselves because they were plain-sawn. Even a plank of hard wood such as maple, even one this thick, cannot avoid the laws of physics.
It was likely cut and dried correctly, but as mentioned, changes in humidity over time can crook any plank a little, especially if it was plain-sawn.
When I cut the necessary pieces from this plank to make more guitar necks, I’ll have to plane both faces in order to flatten them again. At that time, it’s important to shave down both faces by the same amount to prevent it from becoming cupped again.
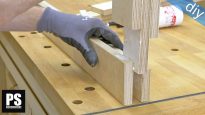
Even though the plank is already dry, the inside will always retain some more moisture than the outside, and if we shave down the piece on one side, we will be upsetting its structural balance again. Here you can see me doing a similar process.
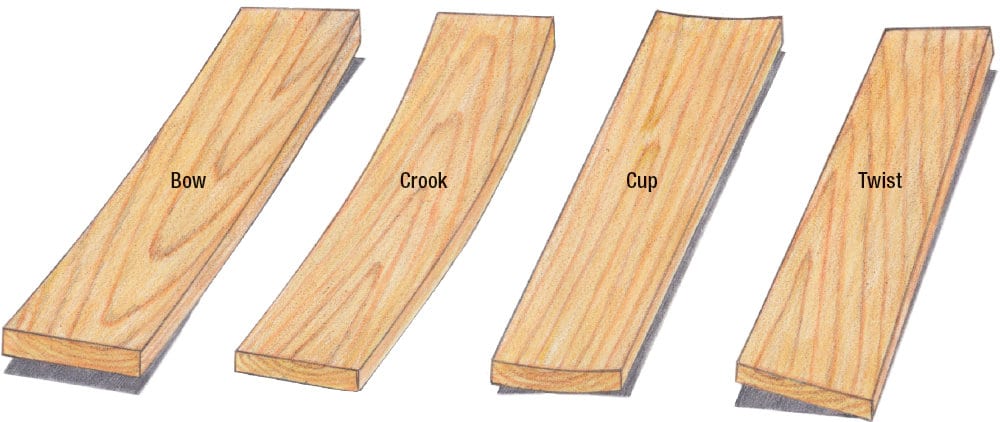
Source: woodcraft.com. Besides the warping on the ends, boards can deform lengthwise for the same reasons. Below you will see an image depicting the most common types of warping in boards and planks, with their corresponding names.
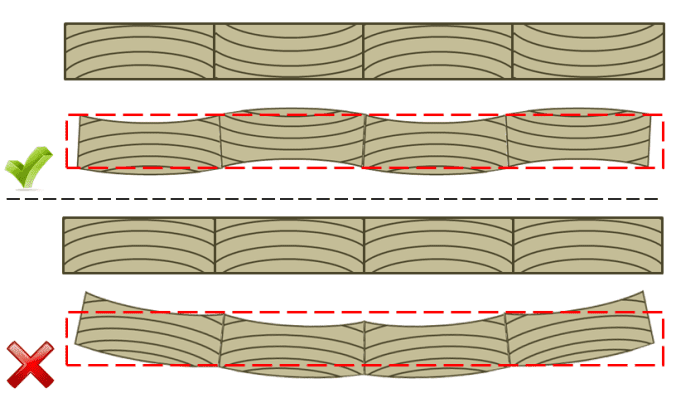
I don’t want to finish this article without some advice on the best way to glue pieces of wood together to make a wider board, such as when we want to make a tabletop.
As you might have guessed, the ideal thing would be to have a few boards with perpendicular grain, from rift-sawn wood. But since this is rarely possible, or since we may be looking for a more striking grain pattern, which is what plain-sawn wood provides, we must alternate the grain in each board as shown in the image to prevent warping in the resulting panel.
If you have any questions or you think you can provide more information to this article, you are welcome to post in this thread in the forums:


Another amazing blog. An excellent summary and very well explained. Thank you!
thanks Kevin!