For a while now, I’ve been thinking about making a new tutorial video to make understanding and using the plans on my website as easy as possible, and here it is! How to use and understand DIY plans.
I’ll show you what programs you need to open and use all the files, the many ways in which you can use the plans according to your way of working or the tools at your disposal. At the end of the video, I’ll also be showing you how to download some of the woodworking free plans you’ll find on the website, which will allow you to have a better idea of everything you need.
Necessary Programs:
The required PC or mobile programs are: a decompressing program like Winzip so that you can decompress the files you download, a PDF reader such as Adobe Reader, any program that lets you view images, a CAD program like SketchUp and an optimized cutting diagram program like MaxCut.

After downloading the zip file on your computer or phone, first you must decompress it. To do that, install the decompressing software and right click on the file and press “extract here.” Open the new folder and you’ll find folders including all the files, sorted by categories.
All my plans are in millimeters, but I’ll show you how you can change some of them to inches. Besides, some texts or names of fasteners are English-only, but they’re easy to understand.
First I’ll open possible the most important folder, known as “cutting list.” Inside you’ll find several PDF files. This list is a reference of all the pieces along with their width, length, amount and material. If you scroll down, you’ll find a 3D model, helping you locate each piece.
I highly recommend printing it out and having it on hand to locate pieces or check their measurements.

Now I’ll open the PDF with all the necessary fasteners, amounts, types of screws and their measurements. Each name is a link to the site’s forum, where you can see pictures of the fasteners and, in many cases, where to find them. I would also suggest printing this file.
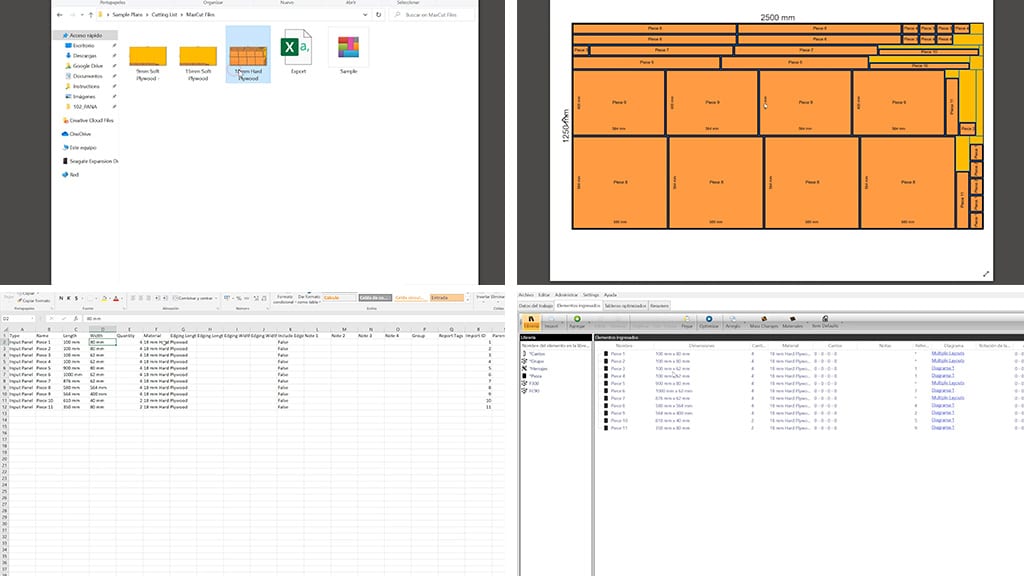
Inside the “cutting list” folder there’s another folder named “maxcut files.” Open it to find the optimized cutting sheet for each board. The name in each picture indicates the type and thickness of each board, and you can open the image to see all the pieces and the external measurements of the board. If it is a small project, the plans may not include this folder.
This is an Excel file where you can see or edit the measurements of each piece, or import to other optimization programs (third photo). Here you can change the measurements of some pieces. For example, you can make any project taller or wider.
You can also import this Excel file to an online application where you can change the measurement units to imperial. Finally, this file is used to open the project on MaxCut. I’m using the free version of this program. Though it has fewer features, it’s enough for these kinds of projects (fourth photo).
By opening the program, you can see the optimized sheets, and this is the input items tab. You can edit or delete entries, or add new ones. The first time you open this program, it will ask you to create the boards. Their names can be copied from the images I showed just now.

The program has an option to change the language, and a neat thing you can do is go into “settings” to change the measurement system, even to imperial. Another option is opening the program without loading the project and importing the Excel file included in the plans.
There is no Mac version of this program, but there is similar software which will surely allow to import the Excel files. Here you will find another interesting online application to optimize your boards on a Mac device. And here you will find a specific manual for Maxcut on my website.
I return to the main menu and go into the instructions folder. Here you’ll find PDF files and links with information on how to build the project. This is the link with the assembly instructions on the site. In these online articles, you’ll also find more links to additional information. This is the instruction PDF, which you can print out so that you can keep it handy (fourth photo).

Here’s another interesting link where you can see the project, made by other users. It can give you ideas on modifications to the original design, or on other materials and construction methods (first photo).
In this folder named “web instructions,” you’ll find links to other manuals, such as this one, where I’ll go into interesting topics like which tools to begin with, required knowledge, cost or safety at work. It also contains accurate manuals for programs like MaxCut and SketchUp (second photo).
Now I’ll show you the PDF files with measurements and cutting sheets in the “PDF plans” folder. Here are the printable templates, ready to be printed and glued to the board. They will allow you to premark cuts or holes in a convenient and accurate way (third photo).
They’re only needed for pieces with irregular or curved shapes, so you won’t find every single piece here. These are the PDFs with exploded 3D model views, measurements and names of fasteners. This file contains every piece with plan or scale view, and here’s another PDF with the unexploded 3D model. The plans also come with a folder with pictures of the design (fourth photo).
CAD Programs:
And now the last thing I have to show off are the CAD files. As you can see, I normally include two copies of the same file that can be opened on Autocad or SketchUp. Autocad is a pretty expensive program, but it’s good to have these files which you can import to almost any other CAD program.

SketchUp has a free downloadable version and another online version. I have a Pro version installed on my PC, which is what I will use to open the project. Once it’s open, we can navigate the various scenes I created. By clicking on any piece, you will see its name; you can also take measurements or toggle any of the layers on and off.
Of course, you can also modify the 3D model, but that will require some experience with the program. SketchUp lets you change the units to imperial by going into “Window/model information,” although it’s not completely effective at converting.
Now I’ll open the exploded 3D file, from the free online version of the app, to show you how it works. Before anything else, we must create a user account, look for the model on our PC and open it. Once it’s open, we can see the interface is slightly different, but the tools are quite similar. We can also take measurements, consult the name of each piece or switch between different scenes. Here you will find a specific manual for SketchUp on my website (third photo).
Some plans include a CAD file with a DXF extension so that you can import them into CAM programs so that you can machine them with a CNC, like in this case (fourth photo). By clicking on each piece, you can see its name in the “layers” section. After importing these files into a CNC’s CAM program, you will need to check the rest of the plans to see if the router bit has to cut on the inner or outer face of each trajectory, or the depth of the cuts to generate the G code.
I’m going to give you a brief summary of the steps you will have to follow once you’ve downloaded the plans. First off, you should become familiar with the plans and the project themselves and go through all the files like I just did in this video. Print out the files that you should keep handy such as the cutting list and find the materials and fasteners you need.
If you have a table saw, you could cut all of the materials at home, but if it’s a large project or you don’t have a table saw, you could also take the list to a woodworking store, where not only will they sell you the materials, but also cut them and mark each piece with a reference number. I’ve had materials cut on more than one occasion in large projects, such as my woodworking workbench. To avoid unwanted surprises, ask for a quote for the materials and then for the materials and the cuts to see the difference.
The next step is to follow the videos, and look up the rest of the measurements, such as holes or rebates on the PDF files included in the plans or by measuring them on SketchUp.
How do I download the Plans?
The last thing I wanted to talk about was how to download some of the free plans available on my website. Downloading one of these is an excellent way to get a better idea of what they’re like.
Look for one of these free plans on the site, like the drill press stand. In the product page you’ll find information on the project and everything included in the plans.
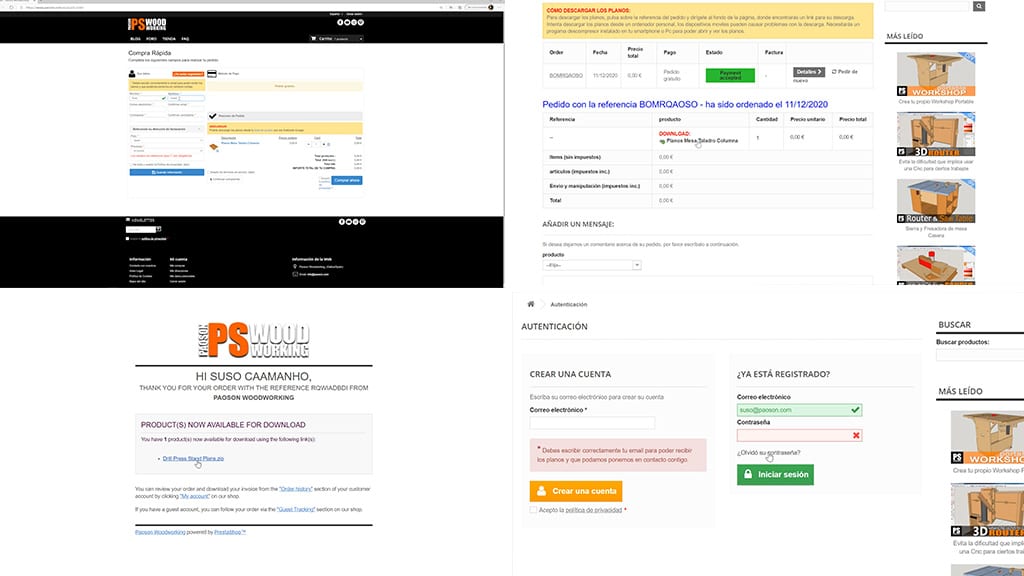
Click on “add to cart” and it will open a window where you can complete the process or keep browsing to see more products. This time, I’ll click on “checkout.” If you’re already registered and logged in, your information will appear on the left-hand panel, if you’re registered but haven’t logged in, you can click on “already registered” and enter your email and password.
If you’ve previously saved this information on your browser, it will show up as a suggestion when you click the box. If you’re not registered, you can do so easily by using this panel on the left.
First, enter your name, surname and email address. It’s important that you type the address correctly in order to receive the emails with the link to download the plans. Type a password and confirm. Set the address, click on “I have read and accept the Privacy Policy” and finally click on “save information.” We are registered on the site. On the right, click on “I agree to the terms of service” and “I accept the privacy policy” and then click on “checkout.”
That will open a new window where you can download the plans directly from your user profile. You can download your plans from here whenever you need them by logging in. You’ll also receive an email with a link to download the plans. If, for any reason, this doesn’t work, right click and select “save link as.” If you can’t find this email, check to see whether you entered the right email address on the site and also your spam folder.
Forgot your password:
If you’re already registered but lost your password, click on “forgot your password” and you’ll receive an email to restore it. Don’t forget you can download the plans whenever you need them from your user account on the site.
Once you’ve logged in, click on your name and enter the “Order history” section, click on the order reference and at the bottom of the page you’ll find a link.
That’s all for today. I’ll be uploading new videos with new projects soon. See you!


I would love to see *.stp versions of the cad files, since i don’t like sketch up and only the pro version of it can export to step.
hi George, I am sorry you are having trouble with the plans. It is impossible to share the plans in all the versions that exist, I think that .skp and .dwg are the most used.
Tus proyectos son espectaculares
muchas gracias Jason!
Thank you. I have been a long time subscriber and really enjoy your style. When I get in my permanent home I hope to be able to make all you tools.
thanks!
Boa noite, sou novo como assinante, sou do Brasil e acompanho seu canal no Youtube há um tempo, comprei o projeto dessa bancada, gostaria de saber qual o local mais fácil para orientações de fabricação ?
I Like your working
Hello
Can all the pieces be brought to a Cnc ship to get cut? For the mobile table saw and router table??
I am building the table saw sled and am modifying it for using a dado set. I was wondering if the adjustments to accommodate the ZC arrangement has been done since it’s centerline is not located at the center line of a single blade. I expect to use only up to a 3/8′ dado. Maybe the solution is having a smaller insert for the dado on the right side. Just wondering. Thanks.
hi Brad,
yes, that way you will have to make the insert on the right side smaller
I bought the saw table plans en like to know what type of plywood you used.
Is it poplar plywood? or a other kind like okoume. I like the light color of youre wood.
And if it is poplar plywood, is it hard/strong enough?
Hopefully i get the answer.
With kind regard Ben,
hi Ben, I usually use poplar plywood veneered with eucalyptus or birch plywood. Here you will find more info: