Welcome. This is the third and last article in the series about the modular woodworking bench. Like I said in the previous article, I’ll try to show everything it can offer and how to join the modules together.
Modular Workbench Plans
When I finished my previous multifunction woodworking bench, some of you asked me whether it could be scaled for smaller workshops. Well, my first idea was to make it modular, and finally, using the same building system, I’ve designed this modular bench.
Approximate weight: 80kg. (without storage)
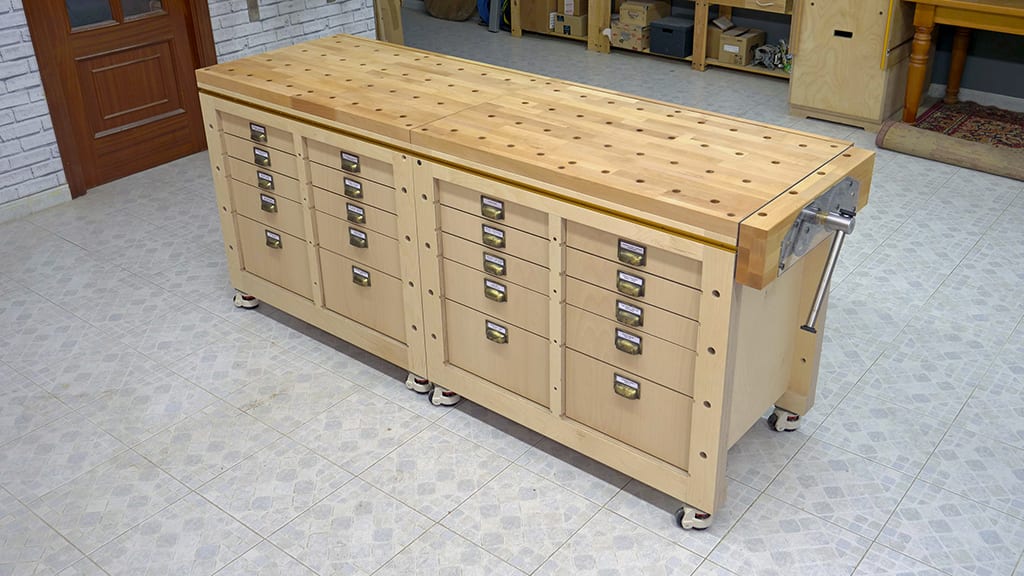
Overall dimensions: 900mm high, 1000mm width and 600mm depth.
It’s an addition system, where pieces are glued together until they reach the desired thickness, so it’s going to be easier to build and will require fewer tools.

If you’re interested in making this bench, I recommend watching all the videos for my previous multifunction bench. The design is very similar, but some steps were different and you might find ideas that are better suited for your tools or the way you work.
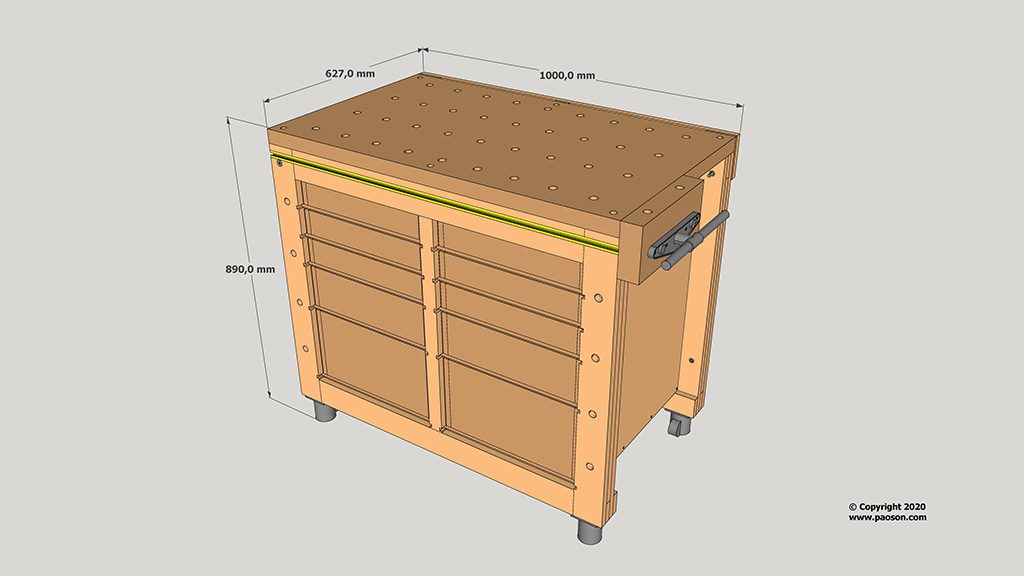
Here’s the 3D file you’ll find in the plans that you can buy on my website. It’s built using the same system as the Multi-Function Workbench I made, but this one is smaller, about 100cm long and 60cm deep.
Scaling the modules is very easy. You only need to print out the cutting list and the exploded 3D drawing that shows the reference of each piece. If you want to make it wider, look for all the horizontal pieces and add or subtract the difference.
If you want to change its height, do the same with all the vertical parts, for example, if you want to use different wheels. You can also make the legs longer and not install wheels, or you could make one longer module with a leg in the middle.
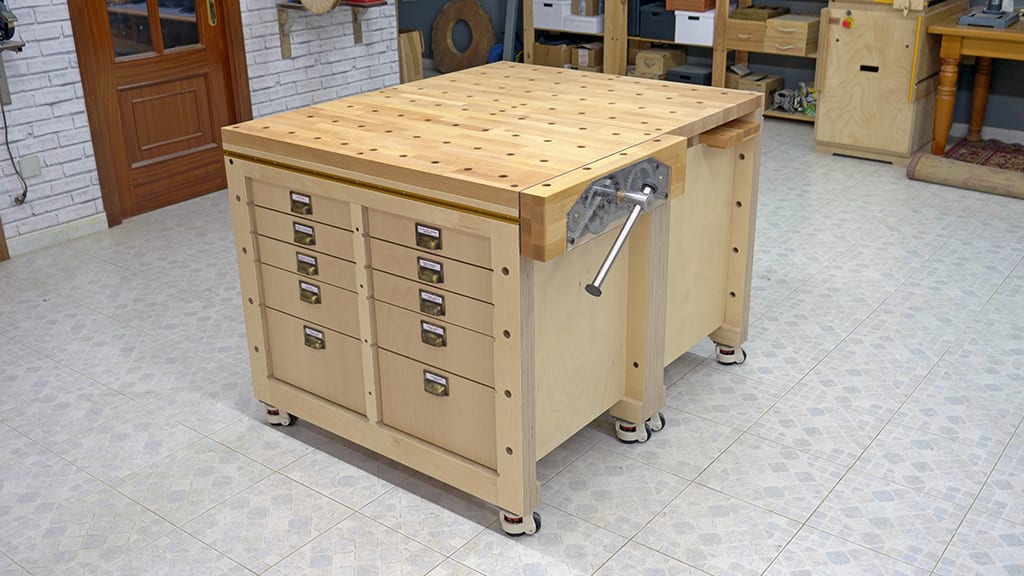
I’ll use it as a mobile tool stand so that I can work more freely with tools on the table, like a lathe. Attaching the modules to one another is pretty easy. First I have to loosen and rotate these two plywood pieces.

Now I must lock the wheels of one of the modules and bring the other closer until they touch, and lastly, fasten the connecting screw. This kind of wheels allows us to adjust their height so that the modules are level.
That’s one of the advantages of using these wheels; though they’re harder to lock than others, once they’re locked they provide more stability to the bench, and their height can be adjusted.
If the floor is perfectly level, you might be able to use an ordinary set of wheels. As you can see, I have made a wrench to regulate this type of wheels more easily, here you can download the free printable template.

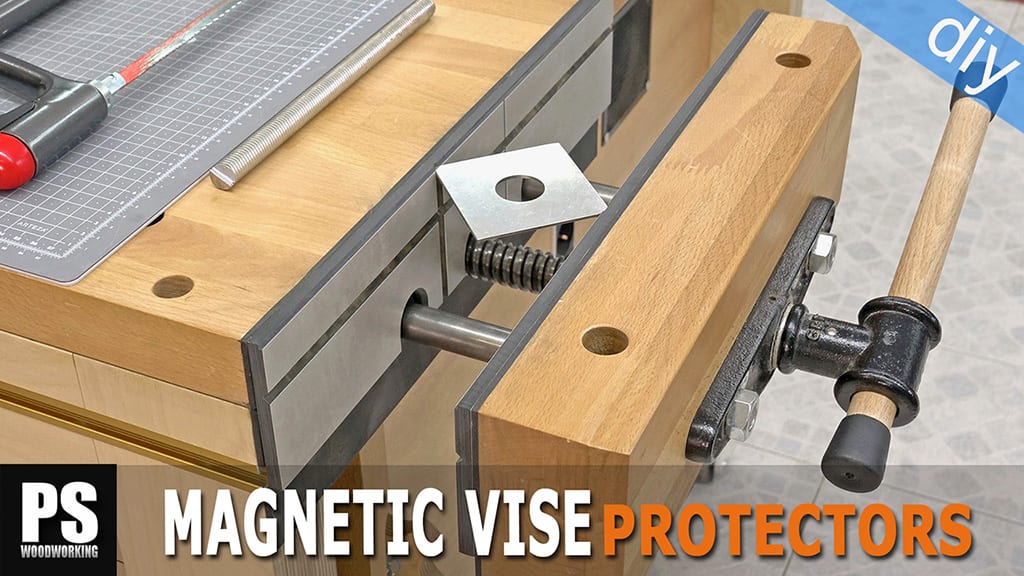
I’ve installed this gear-driven vise. It’s called Twin Turbo Vise and offers a wider range of advantages compared to a regular vise. We can choose between two speeds depending on our needs, it has wide opening jaws to hold large workpieces.
The separation between the threaded rods is also wider than usual, meaning it can hold wider workpieces, and you can hold pieces on their ends without the vise tilting to one side.
Of course, you could also install a normal front vise. With this vise I can use the bench dogs I made for my previous multifunction bench. They will allow me to hold pieces in various ways for many kinds of jobs.

The joining mechanism is sturdy enough to hold large pieces spanning both modules. I will also be able to use the holdfast clamps I made a few months ago. With them I can hold long pieces on the front of the bench.
I’ve also attached two t-tracks profiles on the front to allow for more versatility when holding workpieces.

I’ve bought two small cast holdfast clamps that will also come in handy. They’re even faster and easier to use, and are just as good at holding. The plans for this modular bench on my website include all of these accessories, and I’ll also leave links to the materials I used in the video description.
The modules have great storage capacity, with removable drawers of various sizes. I can swap drawers or take them out so I can have my tools on hand anywhere. I’m planning on make all the stands in the same way, so I can swap drawers and boxes between all the stands and benches in my workshop.
I installed organizer boxes inside that I can also move around and swap. I won’t lock them so I can access their contents quickly. This time I’ll use grooves rather than drawer slides; I think both approaches have their advantages and disadvantages.
Of course, slides make it easier to open the drawers, but by doing this I can have bigger drawers, at the same time reducing weight and costs, besides obtaining more mobility, like I said earlier. I can also remove them to use clamps between the top and the bench.
We should be careful when opening them completely, because they don’t have stops. I applied some grease on the grooves and they open with relative ease considering the weight that some of them bear.
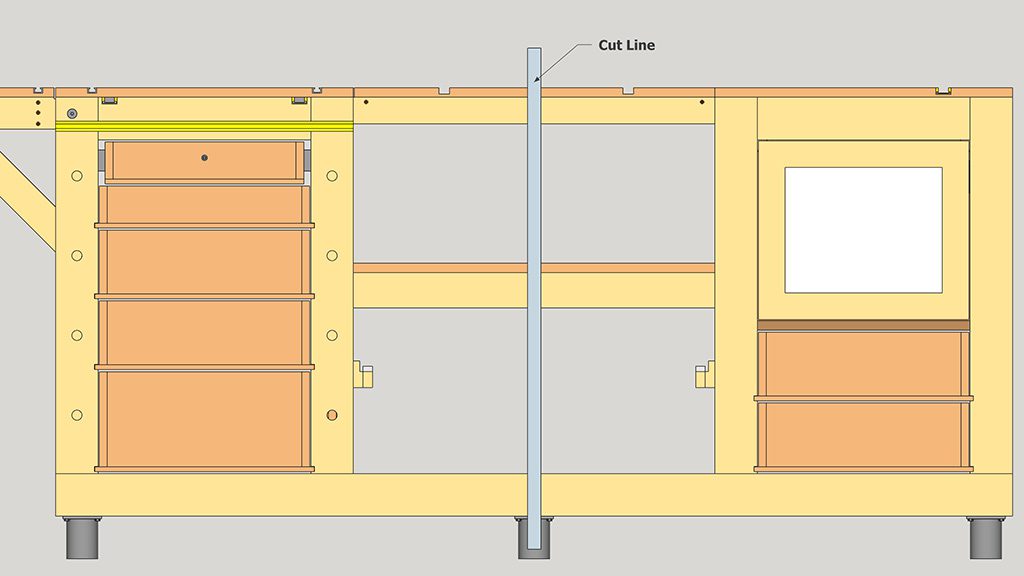
Then I unlock the wheels and use the same screws to join the modules. I made two holes in each leg, but I think that fastening the bottom screws is enough. We can lock and level the wheels again or leave it mobile.
I’ve made two modules for now. The advantage of this system is that little by little you can make more modules and they will always be compatible with one another.

I’m going to continue building the modular bench where I left off in the previous video. First I’ll leave the beech finger joint top completely flat with a hand plane. After that, I’ll mark all the holes on the top for the holdfast clamps and the bench dogs.
I’ll drill the holes with my drill press stand to ensure they’re straight and square. I’ll also use a hand router to chamfer the holes. Now I can sand the bench tops and apply two coats of my oil varnish blend.
I have to remove the tops momentarily so that I can place the threaded inserts that hadn’t been placed yet. After cutting the t-tracks to size, I fasten them to each of the modules. Now I can cut all the drawer parts.
There’s a lot of drawers, so this will take a while. I’ll also sand all the visible edges in groups of 20 pieces so I can finish sooner. I’ll use my 3D Router and a countersink bit to drill all the holes that will allow me to join the drawers together…
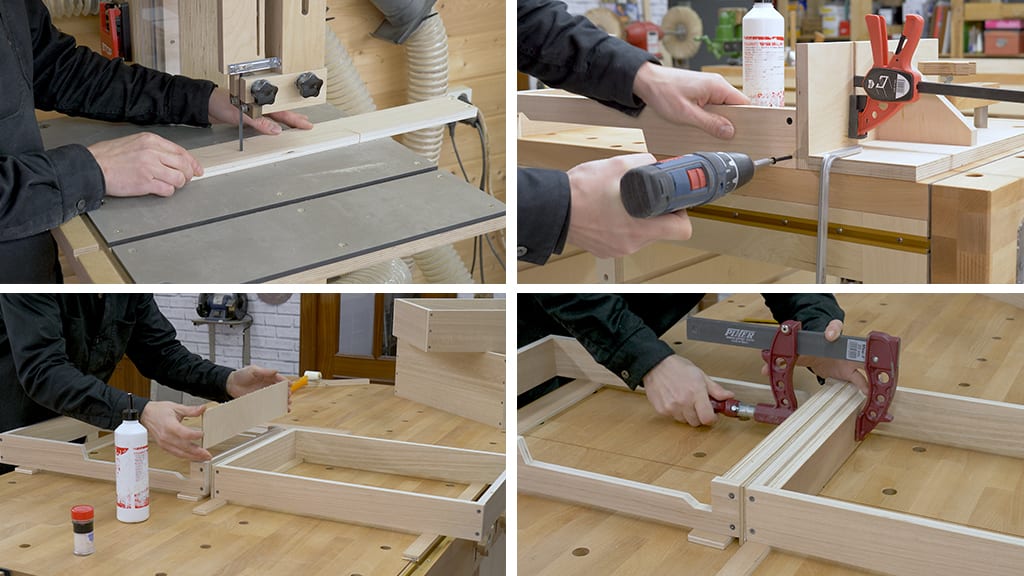
…and with the band saw I’ll machine the sides of the necessary drawers so that I can place the organizer boxes. To make this joining process faster, I’ll use my old jig. As always, I predrill the position of the screws first with a bit, apply a little wood glue and place the screws. This way, the bond will be stronger.
Now I’ll cut the drawer fronts. I’ll use 4 mm thick beech veneered MDF. This step is completely optional, and I’m only doing it for the sake of aesthetics. I’ll cut and mark them ensuring there’s continuity on the veins. I apply glue and stick them to the fronts of the drawers in twos. That’s all for today. See you soon!


Woah! Such nice work!!! Very impressed. I’m going to plan this for my own workshop modules (yes I will purchase your plans) I was wondering how you would go about setting up some of these modules for:
1) a table saw
2) a mitre saw
3) a benchtop jointer
I plan on building a good few of these to be used as base cabinets and the aforementioned 3 to pull out when needed.
Thoughts? Thanks, Danny
Hi Danny, I want to make some of those tools with the same build system, stay tuned!
I really love your design of both the mini and the full size workbench but I have only a small basement shop and need a workbench that is larger then the mini but smaller then your full sized bench. Is it possible to scale up the plans for something that would be 6 feet long (1800mm) by 3 feet (900mm) Could one of your current designs be scaled up or down and would it be possible to have three banks of draws or two banks with a shelf cabinet or something like that. I think that would be the perfect size for my small shop
Also, do you sell your hand made holdfast clamps? I love them but don’t quite have the craftsmanship yet to get this done (especially the wood cylinder parts).
after watching your video I had exactly the same questions already asked above by Danny Malouin. As i have a medium term project to refurbish my garage/workshop I will patiently wait the table saw and mitre saw projects to download all the plans in one shot. In the meanwhile i subscribed your Youtube channel: awesome jobs! Thanks M
I bought the design. I’m interested in the drawer handles. Please provide links for those interested. Thanks!
hello, check this out:
Hi and thanks for the plans, just downloaded them. I plan to built the bench without drawers AND I would appreciate not to have the vertical board in the middle so I’d be able to store my large miter saw in the bench. Anyone having stability concerns without the board in the middle?
hi Holger, you can make a single module and without the vertical board, I don’t think you have problems. Send me some photo please, I would like to see the result
Thanks a lot. Sure will post the results. BUT I am a newbie so don’t laugh and have patience. Might take a while 🙂
Hello
Just bought the plans and intend to get started this weekend. I’m thinking of using MDF instead of plywood (supply and cost reasons) however the MDF comes in different thicknesses.
3mm, 6, 9, 12, & 16mm
What affect will that have on the plans where 9mm, 15mm, and 18mm are specified?
Thanks
hi Jon, 18mm thick MDF is pretty easy to find, have you looked for it? Instead of the 15mm board you can use the 12mm one, or even the 18mm one too.
Almost all the pieces of that thickness (15mm) are for the drawers, you will only have to subtract or add the difference in thickness to the front and back pieces of the drawers. This article may be of help, although it is another design, it is the same steps
Hey
Thank you. I ended up finding 18mm MDF (in store but not listed online) but went with plywood instead. However that was 17mm instead of 18mm and I’ve had to adjust a few measurements!
I’m almost there – bench is assembled and I’ll be doing the drawers this weekend. Really happy with the design and plans so far!
Also learned that I need to be a lot more accurate with my cutting…. Trying to rip long boards sitting on the ground wasn’t conducive to accuracy. I’m now ‘trimming’ smaller pieces to size on the table saw and getting much better results.
I like your table saw bench with fold down sides and think I’ll jump straight in and build that next.
Thank you!
🙂