What is Finger Joint Board?
An finger joint board is a kind of board made by joining long strips of wood together. The pieces are between 2 and 5cm wideand the staves can be as long as the board itself called full stave board, or about 20/30 cm long and joined end-to-end with finger joints until they reach the desired length.
The greatest advantage of this kind of board is that we can make large solid wood panels, impossible to achieve with a single log. Besides, since they’re made with small planks of wood, they allow for greater dimensional stability. When making them, the grain is alternated to reduce torsion in the resulting panel. In this other article you’ll find more information on how it’s made. I came across the above video in Spanish. It’s old, but very insightful. I recommend watching the entire thing.
The other great advantage of any kind of board, which I mentioned at the beginning of the article, is that you’ll need far fewer tools than if you buy raw lumber.
It has a small disadvantage compared to plywood or MDF, it’s more prone to absorbing and exhaling moisture, changing its size. Keep in mind that it’s a large amount of wood and the boards are quite wide. This changes depending on the wood it’s made of.
There are many thicknesses and raw materials, the most common being beech, oak and pine and 18, 27, 32 and 40mm thick.
The boards are 250cm long and 120cm wide, although some stores have bigger panels, the weight of a finger joint board depends largely on the wood used, but to give you a rough idea, an oak board with the above measurements weighs around 40kg. The ones that are used as countertops can be up to 3m long and 65cm wide, with various thicknesses.

This is one of my modular workbenches. You can see the many strips that make up the board, as well as the finger joints.
Besides benchtops, they’re mostly used as countertops, desktops or stairs. They can be used for many other things, from making furniture to building houses.
Types of Finger Joint Boards:
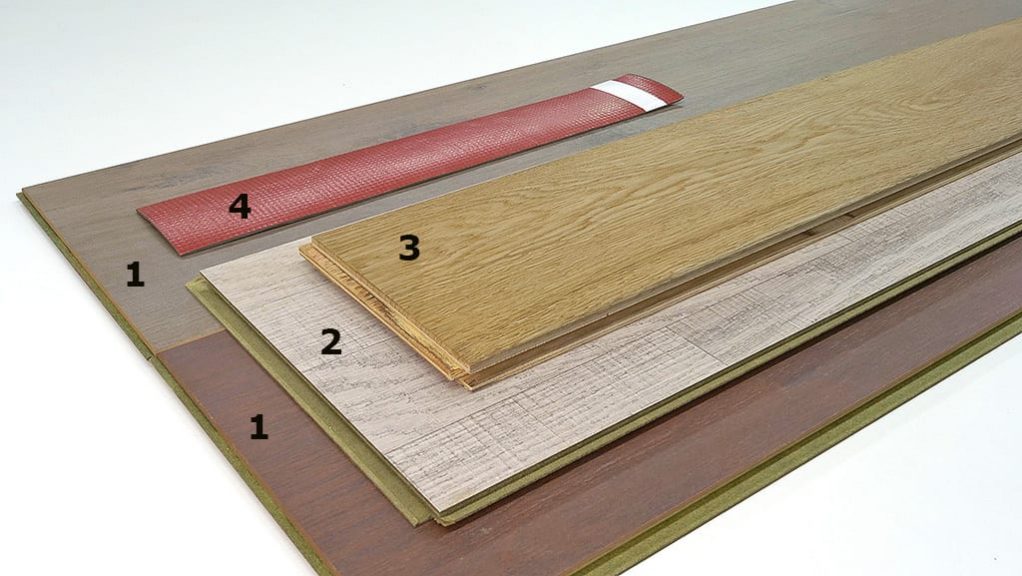
These are some of the edge-glued boards you can find in a carpentry store:
1- 40mm thick finger joint beech board.
2- 30mm thick edge glued pine board. This one is a full stave board.
3- 30mm thick finger joint oak board.
Uses of Finger Joint Panels:
I’ve used finger joint panels in many of my projects, both in homemade tools and in furniture. I’ve used them as a worktop in many of the workbenches I’ve made, as you can see in the first image. It would be hard to make a solid piece of timber with those measurements, so it’s perfect for these sorts of projects where you need a hard wood surface to work on. This one is a 40mm thick beech board.

As I said, this board can expand or shrink due to humidity changes, especially in the first months; later it becomes stable. It changes in size especially widthwise, since wood expands and shrinks much less across the grain. A few months after making the bench, I had to cut down the top again, as it had grown 6mm on the shorter side of the board. It’s normal if you consider the size of the worktop.
We can glue two pieces of panel together to achieve more thickness. I used this to make wooden vises in several of my woodworking benches.
I also used it as a countertop, as seen in the second picture. This one is 30mm thick oak wood, obtained from several cuts of the log, that’s why it has many different tones. Oak wood is hard, which is perfect for the heavy use it will see in the kitchen. To protect it, I used three coats of pure linseed oil.
In the third picture you can see how I used it as a top for a metal shelf. I built it with leftover parts of the countertop. Oak wood goes nicely with metal.
I also used a 30mm thick finger joint board to make the top shelf of an open wardrobe. In that case, I used pine wood to make the shelf lighter; you can see it in picture 4.
Processing Finger Joint Panels:
Working with finger joint boards is not too dissimilar from using other kinds of boards, but there’s a small difference. As I explained a few lines above, this board is made with small strips of wood that are glued together, so you might find a strip with grain in one direction next to a strip with grain in a different direction. This makes them hard to plane sometimes, and if you’re not careful, you might tear out the grain in some of the strips.

Aside from that, it’s not too complicated. It can be cut easily with a disc, and milling it is also simple. If you need to use a router, don’t forget about the alternation of the grain. It produces a moderate amount of dust, just like timber boards.
It can be screwed easily, both into the face and into the edge, making a pilot hole with a bit 0.5mm less wide than the screw. Just like with the other boards, we can use biscuits and dowels –you can see me doing it in the second picture.
It’s as easy to varnish as other presentations of wood. If the board doesn’t have any defects, you can start by sanding it with P120 grit, and finish with P320, then apply varnish or oil, which you can see in picture four.