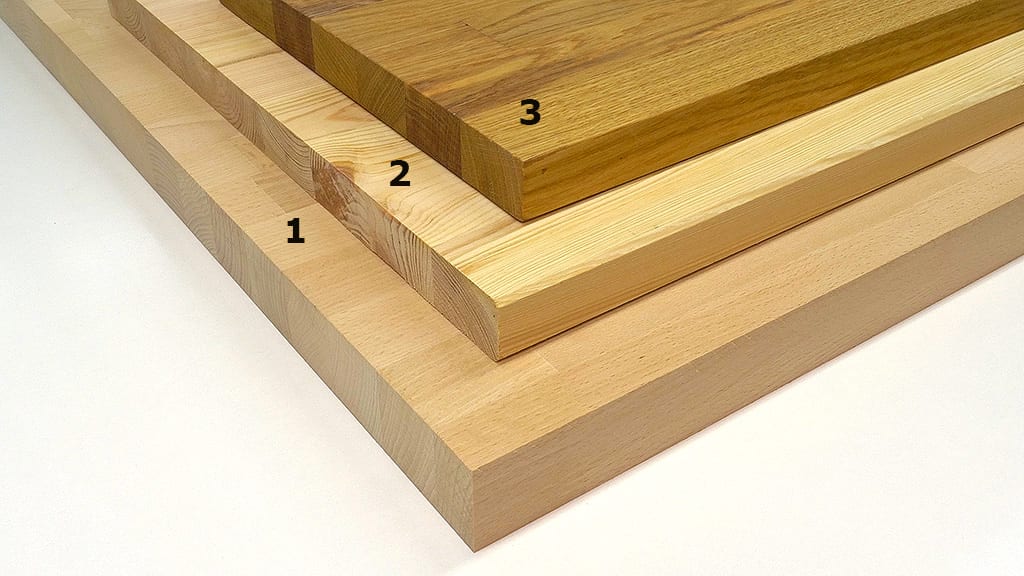
What Is MDF?
MDF or medium density fiberboards are made almost entirely out of pine wood. First, the bark is removed from the logs, and then later they’re shredded in a chipper that looks like it’s straight from hell, turning the log into chips in just a few minutes.
These wood chips are then washed to remove lignin and all kinds of impurities, and then they undergo a process of thermo mechanical defibering. The resulting fibers are mixed with urea-formaldehyde and paraffin and subjected to pressure and heat on metal plates that form them into a board. That fibers are sorted into different sizes, the finest ones going into the outer faces of the board.
The result is a fairly stable and sturdy board, with a fine, even texture, perfect for all sorts of woodworking and furniture projects. There’s normal and waterproof MDF, the latter being designed for use in humid environments.
It comes in many thicknesses, the most common of which are 3, 5, 6, 7, 8, 10, 12, 16, 18, 19, 22, 25 and 30mm.
They’re usually 244cm long by 122cm wide, although you may find bigger ones. The weight of an 18mm thick MDF board is around 40kg, it’s a pretty heavy material.
Just like with plywood, there are many qualities depending on how it is manufactured, and it takes some experience to tell them apart. Try not to buy them in large DIY stores.
It’s a sustainable material. Less wood is wasted compared to when you use solid wood, and it’s easy to recycle into other boards.
Types of MDF Boards:

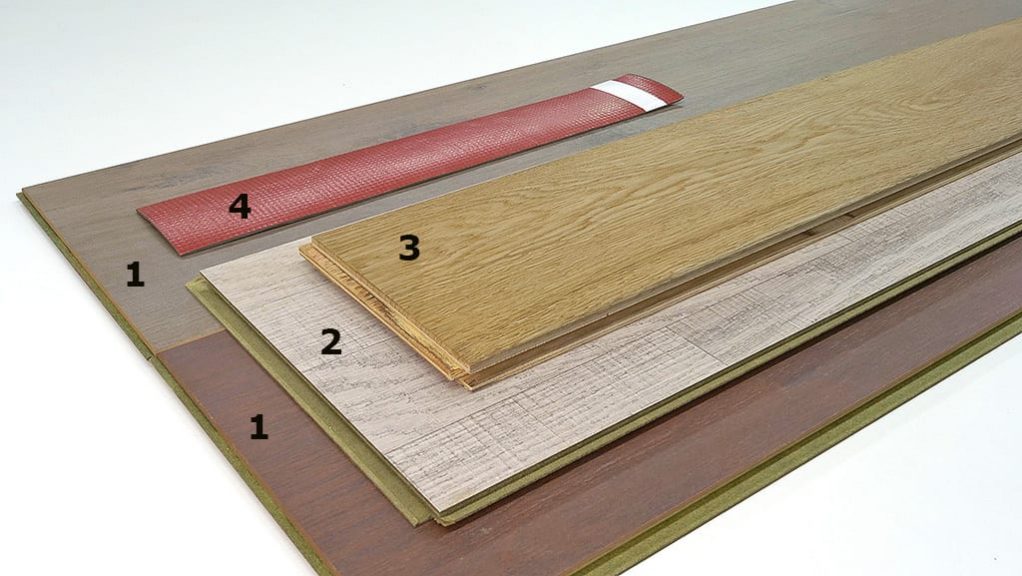
These are the main types of MDF you may find in a carpentry store:
1- Hardboard: It’s not exactly MDF, as it’s high density, rather than medium. As the name suggests, it’s made using higher pressure and temperature compared to regular MDF, yielding a harder board. It has a smooth face and a rough one. Not very thick, suitable for back parts of furniture or drawer bottoms. It’s also used to make flooring and boxes.
2- Waterproof MDF, 18mm thick in this case. Contrary to popular belief, the green dye is not what makes it waterproof; it’s just used to distinguish it from regular MDF. For use indoors in moist conditions.
3- Colored MDF. In recent years, this kind of colored boards have become more popular. They come in lots of colors. Great for furniture and interior decoration.
4- Normal MDF. The cheapest and most common MDF, this one is 10mm thick. Only suitable for use indoors in relatively moisture-free conditions.
5- MDF with melamine on both sides, this one is 5mm thick. Easy to find in many thicknesses and colors. The melamine may also imitate other woods. It can be normal or waterproof.
6- MDF with a beech veneer; this one is 16mm thick. Other thicknesses are easy to find, with veneers of all kinds of fine woods. It can be normal or waterproof. Ideal for making furniture. Just like with plywood, veneered MDF is thicker; for example, the 18mm one becomes 19mm thick.
7- Post-formed MDF. When MDF boards are made, the heat presses can have reliefs that create shapes on the sides of the board, like in this one. It’s a piece of plinth with melamine on both sides. Similarly, interior doors and furniture doors are made by covering the board with melamine, PVC or paper.
As you can see, almost all MDF boards come in normal, waterproof and fireproof versions. If possible, it’s best to buy waterproof MDF.
Uses of MDF Board:
This is not the type of board I use most in my project, but I have used it when I needed a smooth surface that had to be painted, such as the doors of the kitchen I built a few months ago, or the fronts of the drawers in the open wardrobe in the second image.

When I needed a veneered board and wanted to avoid spending money on a plywood veneered board, I also used MDF. It’s also what I did with the doors of the multifunction workbench, where I used 16mm thick MDF with a beech veneer, to match the bench top. In general, MDF is much cheaper than plywood.
In all of those instances, the pieces didn’t need to be particularly hard or stable, and weight wasn’t a huge concern.
I most often use thin MDF, 3 or 9mm, with melamine on both sides. It’s a highly versatile material to make router templates and things like that.
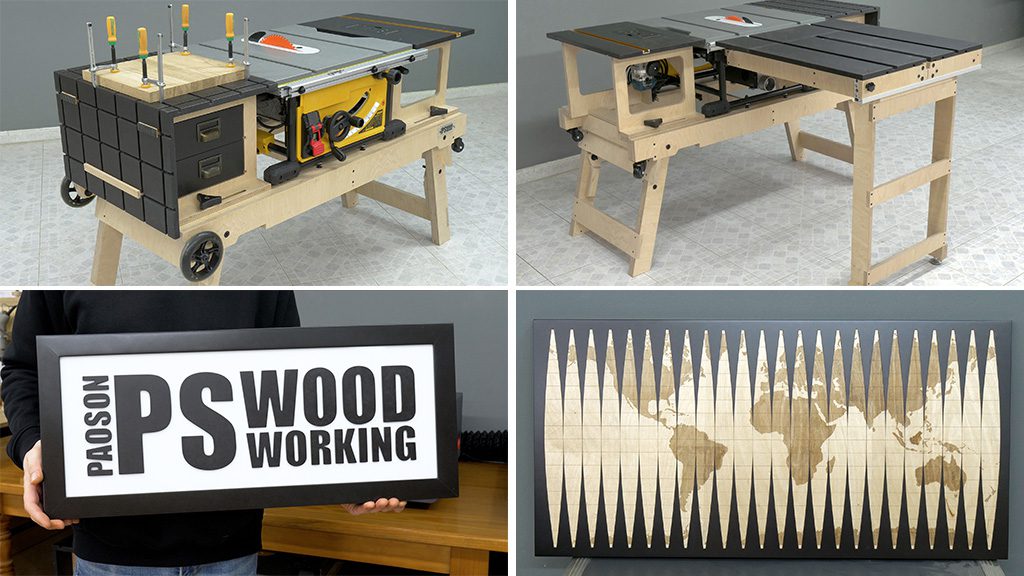
I used black-tinted MDF in other projects, such as the tops for my folding workstation. Also I decided to use this board mostly for aesthetic reasons.
I also made a light box sign with my logo and used it as a base for a 2D projection of planet Earth. It’s a kind of board I really like for these projects. It looks very elegant after applying a couple of coats of nitro lacquer.
Processing MDF Board:
Since it’s a homogenous material without grain, MDF is easy to cut and mill. It produces a lot of dust when doing so, as you can see in the first and second photo, so wearing a mask when processing it is advisable.

Gluing MDF faces together with carpenter’s glue is easy, as shown in the third picture, where I’m making doors for a kitchen, it works even better when gluing miter joints.
In the fourth picture I’m gluing a 4mm thick MDF with a beech veneer to the front of the drawers of the modular workbench.

It’s also easy to drill, like in the first picture. Joining MDF panels with screws is not as effective as with plywood, though. If you’re going to screw two faces together, as seen in the second picture, it won’t be a problem. However, screwing into its edge is not so easy. First you must drill a pilot hole with a bit 0,5mm less wide than the screw, and then try not to overdo it when tightening the screw, otherwise the board will split on the edge, making the joint useless. It’s best to use biscuits or dowels in these cases.
There is another option to join MDF pieces called furniture camlocks. They make the process a lot easier. You can assemble furniture in your workshop, then disassemble it to varnish and transport it and finally reassemble it at home or in the place where you’re working. The usual way to use cam locks is to machine the pieces in a CNC, although with patience, the necessary holes can be made with a drill press.
Both the edges and the face of bare and veneered MDF are very easy to sand; you can see me doing it in picture three. It’s also easy to varnish, by hand or with a spray gun. Logically, bare edges soak up more varnish, but with a bit of practice you’ll get good results.
In picture four you can see some bare pieces of waterproof MDF on which I had just applied some matte white lacquer with a roller and by hand, for the fronts of the open wardrobe. MDF with melamine is excellent for these kinds of lacquering jobs, with melamine acting as a background, it doesn’t need as many coats. You must sand the melamine down a little before the first coat with fine grit.
If the MDF board has a wood veneer, we will have to apply edgebanding of the same wood. It’s easy to find in carpentry stores. Some of these edgebanding strips are preglued, so you only need a hot iron and pressure to glue the edging to the board. In some of my projects I left the edges of a board uncovered, without edgebanding – it’s fine.


I have a question: does it make sense to use MDF as a basis for the top of the workbench and glue another solid wood on top of it? In other words, in the workbench project, can the top be made of a 30mm MDF board (or less, if 30mm is too much) and on top a series of glued tiles of iroko wood? I have a lot of spare 40×8 cm iroko parquet tiles (2cm thick) and I’ve thought it could be nice to use this kind of wood as a top of the workbench. What do you think?