Cole's Portable Workshop

Share your woodworking projects!
Post Reply
Cole
Posts: 14
Joined: Fri May 27, 2016 4:18 am

Cole's Portable Workshop

Post by Cole » Tue Dec 06, 2016 2:33 am

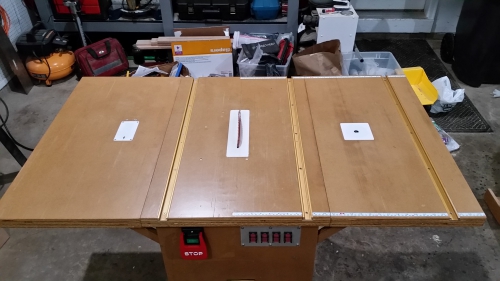
Thanks Suso for offering plans for your project. I am very happy with my saw and your instructions are the best and most detailed I have ever saw online. I used 3/4" and 1/2" MDO plywood for my project. It is not the best looking wood, but it is very stable and does not warp. It has a resin mixture on the top coat and I added coats of oil based poly for extra protection. I added four switches to contol my saw, jigsaw, router, and shop vacuum. The only complaint I have is I do not like the design for the saw fence. I have built two and neither is square to the blade due to small inaccuracies during the build. Some day I will design something better.

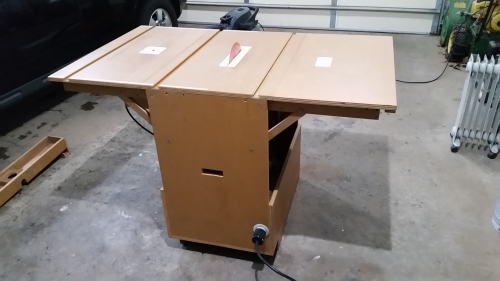
This is my finished saw:

Image


I have a bad back and I wanted my measurement scale visible from the top. If I need measurements cut off by the track I'll have to measure. Easy trade off for speed of adjustment. I put a second tape on the exit side to stay square:

Image


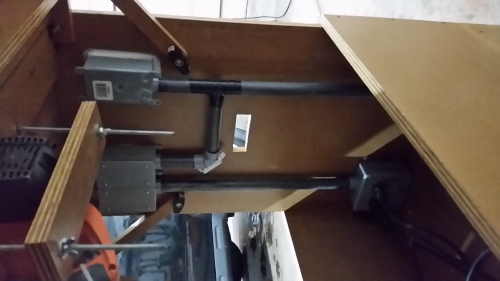
Inside view of electrical. I used conduit to prevent dust and fires:
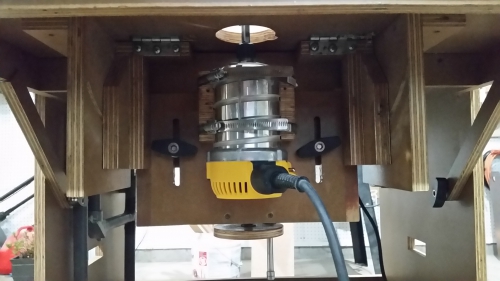
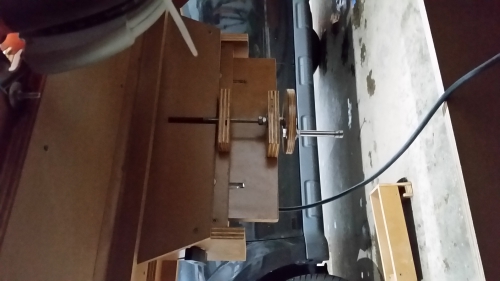
Image

Router lift:

Image

Image


Back side with elecrical entry NEMA L20:
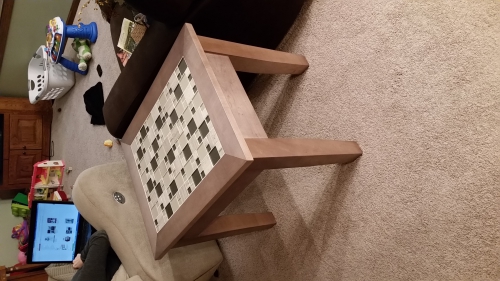
Image


My first project:

Image

Suso
Posts: 2242
Joined: Thu Oct 22, 2015 4:51 pm

Cole's Portable Workshop

Post by Suso » Tue Dec 06, 2016 5:17 pm

WTF! some of your changes are very clever, I hope you use it and do not stop sharing your beautiful works like this table!

Cole
Posts: 14
Joined: Fri May 27, 2016 4:18 am

Cole's Portable Workshop

Post by Cole » Tue Dec 06, 2016 6:00 pm

Thanks Suso. It definately took longer than I wanted, but I am happy I did it. I have a little bit more pride in my saw knowing I built it. I don't know if you take recommendations, but I would like to see a belt sander video and plans from you next. There are a few youtube videos of people making their own, but very little for plans. I don't want to take the time to design it

Suso
Posts: 2242
Joined: Thu Oct 22, 2015 4:51 pm

Cole's Portable Workshop

Post by Suso » Wed Dec 07, 2016 7:59 am

A belt sander is on my list of projects!

mickey1
Posts: 7
Joined: Thu Jul 06, 2017 10:42 am

Cole's Portable Workshop

Post by mickey1 » Fri Aug 04, 2017 9:18 am

This is a great build.
And the table, wow, I hope I can get some projects like that going on after my build.
Could I possibly trouble you for more details on your wiring? Perhaps a diagram?
thanks
Mickey

Cole
Posts: 14
Joined: Fri May 27, 2016 4:18 am

Cole's Portable Workshop

Post by Cole » Mon Aug 07, 2017 9:27 pm

Thank you Mickey. I am sorry, but I do not have a wiring diagram for the project, and drawing one up would be difficult because my entire system is sealed with RTV and I don’t want to take it apart. I brought over a friend of mine who happens to be an electrician to do the majority of the work. I can explain in theory what we did:

I used 12AWG cable for all wire. I built my own extension cord with NEMA connections on each end:


I mounted a locking flanged inlet Nema connection to my tablesaw:

I ran from there to the paddle E-STOP:

I ran from the E-STOP to the switches:

I ran from the switches to the receptacle

Switch 1 controls the table saw
Switch 2 controls the router
Switch 3 controls the jig saw
Switch 4 is open for when I use a shop vac or orbital sander

mickey1
Posts: 7
Joined: Thu Jul 06, 2017 10:42 am

Cole's Portable Workshop

Post by mickey1 » Tue Aug 08, 2017 2:55 pm

Thanks for helping.
Can I ask do the wires just "daisy chain" through the switches?
i.e. does the live and neutral go out to the tool and also out to the next switch in the chain?
Mike

Cole
Posts: 14
Joined: Fri May 27, 2016 4:18 am

Cole's Portable Workshop

Post by Cole » Tue Aug 08, 2017 5:21 pm

Coming from the E-stop into the switches I have one 12AWG cable (1 hot, 1 neutral, 1 ground)

In the switch box area I have 5 hot wires inside a wire nut and 5 neutral wires inside a wire nut

The hot and neutral coming from the E-stop branches off into each of the four switches. Then, on the other side of the switches I send four individual hot and neutral wires down to my electrical receptacle box. I had to remove the cable jacket insulation for this run because it was too thick to fit through my electrical conduit

Post Reply