H all.
I started this topic to inform you ( and ask questions, get views) concerning my planning to build the portable workshop.
First the the choice of power tools I intent purchasing /using:
Saw: I have already purchased a Triton TSA001 2300W precision power saw. This saw has determined my overall top thickness ending up at 21 mm. I intent using here a reduced "just size" acrylic base plate (with removable insert) which could be removed in total to allow for angle cuts (possibly replace with another insert allowing for the angled cut) etc.
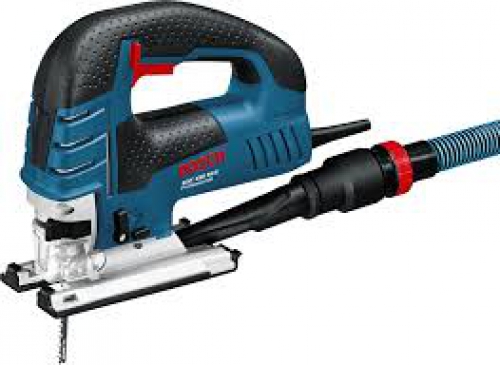
Jigsaw: I still need to purchase a Bosh GST 150 BCE 780W which I intent fixing to a "full size" acrylic base plate (with removable insert) allowing for the jigsaw to be removed from the top of the workshop. .
Router: I still need to purchase a Trition MOF001 1400W Router which I also intent fixing to as "full size" acrylic base plate (with removable insert), also then allowing for router to be removed from the top of the workshop. The size of this acrylic base determined the choice of thickness of the acrylic base to be used re: 10 mm ( a size of 300 mm x 300 mm i.e as researched and found to be correct for the Triton router)
Haven said all of the above I must say that I have not yet made any such base plates / inserts. Luckily Pinterest / the web is supplying a lot insights. lol
Then the tops:
A very good friend of mine has build his own table saw and has used acrylic to cover the top. He has no regrets and is full of praise about its use. I have thus also decided to use 6 mm acrylic to cover the full range of tops. ( I will actually decide on the color on purchase, most probably clear).
I then intent using 15 mm marine ply for the top and the top acrylic cover of 6 mm to give a total thickness of 21 mm for the top ( 3 mm more that the suggested 18 mm). This was decided by allowing (in terms of the Saw) for a under top milling of 5 mm ( 10 mm ply left), . Add to this the top acrylic cover of 6 mm (total 16 mm left). Then allow for the from above milling for the 10 mm acrylic base plate (using the full 6 mm of acrylic top and a 4 mm milling into the ply, leaving 6 mm ply overall)
As I have decided to allow for full size base plates for both the router and the jigsaw, the cut outs into the ply will have to be "almost fully" only allowing for a rebate to affix the base plate to the top, thus then allowing for the units to be removable from the top of the workshop i.e the units will be affixed to its base plate which in turn will be affixed to the rebate by screws & inserts allowing an easy loosening of 4 screws to remove a unit.
PS Suso:
I have checked i.e. that for the length of the router (165 mm) and its width (285 mm which I assume to include the handles), then a base plate of say 300 x 200 would suffice. As your plan allowed for a 80 mm wide (towards sides) insert , a deduce I have a 200-80 mm difference = 120 mm difference which has to be allowed for. Which way to go? Towards the saw, or to wards the outer miter? Or split the difference?
I have a problem resizing images, they come out blurry. Any suggestions?
Any other suggestions on the above?
Appreciated.
My portable workshop planning
-
Suso
- Posts: 2242
- Joined: Thu Oct 22, 2015 4:51 pm
My portable workshop planning
hi Wieger,
all those power tools are perfect for this project! You can also check this post to collect new ideas about its installation.
Then the tops:
I had also thought of using acrylic that way, it's a good idea ... keep in mind that there are several types of acrylic according to its manufacture(cast or extruded), the ideal is the first one.
I don't think you have problems for these 3 millimeters, and it will be very practical to be able to remove the tools from above!
PS
I think it is best to split the difference, keep the center of the router bit in the same place. This user has done something similar
Try to upload the images with their original size, my own system will resize them.
-
Justme
- Posts: 39
- Joined: Mon Aug 29, 2016 8:13 am
My portable workshop planning
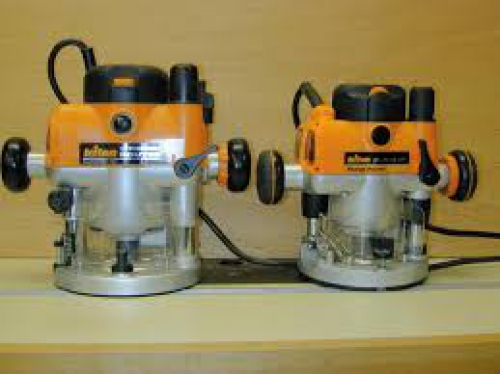
My choice of Router. Note the comparison i.e. 2300 W (Left) and the 1400 W (Right).
I choose the 1400 W for its smaller size, because its much cheaper and it will be more than enough in terms of power. (Still to purchase, probably new as I believe not to get the winder with the used version, accessories are normally missing, maybe I will be lucky)
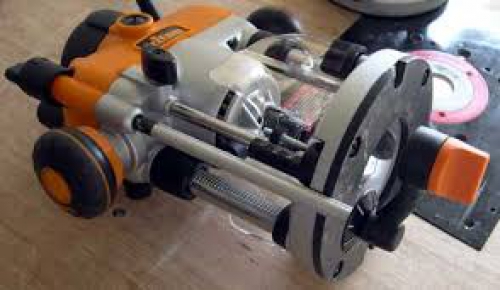
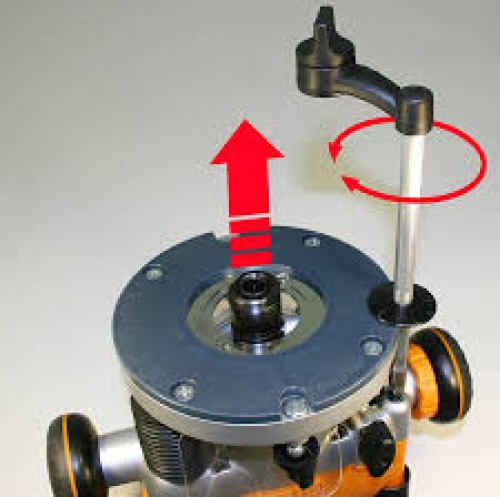
I view of the Router winder. My reason to buy this Router i.e. no need for the router lifter to be build
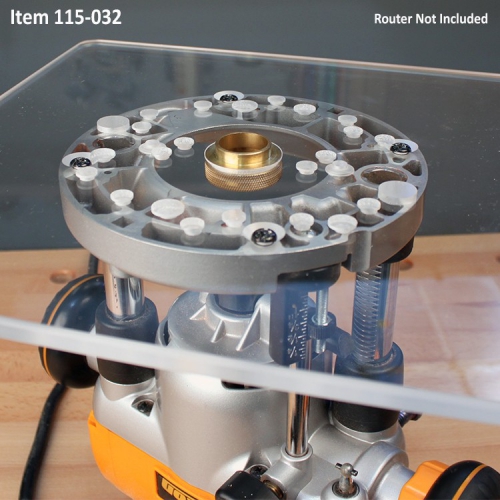
The my intended acrylic base with the router attached thereto
My intended Jigsaw ( still to buy, probably used)
Lastly the Triton power saw (The only item already bought for 136 US Doller at todays exchange rate ZAR / USD

I choose the 1400 W for its smaller size, because its much cheaper and it will be more than enough in terms of power. (Still to purchase, probably new as I believe not to get the winder with the used version, accessories are normally missing, maybe I will be lucky)
I view of the Router winder. My reason to buy this Router i.e. no need for the router lifter to be build
The my intended acrylic base with the router attached thereto
My intended Jigsaw ( still to buy, probably used)
Lastly the Triton power saw (The only item already bought for 136 US Doller at todays exchange rate ZAR / USD
-
Justme
- Posts: 39
- Joined: Mon Aug 29, 2016 8:13 am
My portable workshop planning
wrote:hi Wieger,
all those power tools are perfect for this project! You can also check this post to collect new ideas about its installation.
Then the tops:
I had also thought of using acrylic that way, it's a good idea ... keep in mind that there are several types of acrylic according to its manufacture(cast or extruded), the ideal is the first one.
I don't think you have problems for these 3 millimeters, and it will be very practical to be able to remove the tools from above!
PS
I think it is best to split the difference, keep the center of the router bit in the same place. This user has done something similar
Try to upload the images with their original size, my own system will resize them!
Thank you Suso...at last able to upload the photos.
I have also found a supplier of acrylic in SA with following product description for suitable acrylic.
Abrasion Resistance
An innovative protective coating provides
Marlon FS Hard with enhanced resistance
to marks and scratches compared to
standard polycarbonate. It is suitable for
use where enhanced protection against
damage is needed.
I have received a estimate of 90 USD for the full top ( still need to get a quote for the 10 mm base plates, shouldn't be to much)
Thank you again for all your patience and assistance ( I still have a lot of planning / changes to discuss)
-
Suso
- Posts: 2242
- Joined: Thu Oct 22, 2015 4:51 pm
My portable workshop planning
I also think that the 1400watt router will be enough for your projects.
Looks like a good quality acrylic, I look forward to seeing your first pics of the materials!
Looks like a good quality acrylic, I look forward to seeing your first pics of the materials!
-
Justme
- Posts: 39
- Joined: Mon Aug 29, 2016 8:13 am
My portable workshop planning
Hi Suso,
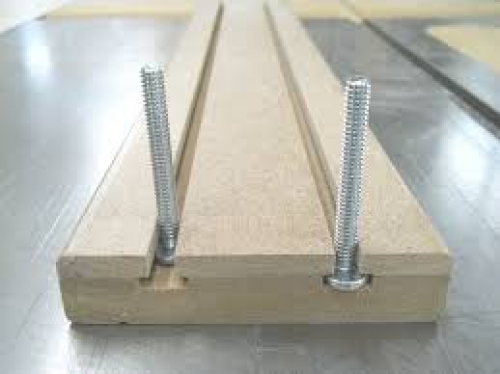
I want to now continue my planning and questions regarding the tops. As mentioned I plan to cover with 6 mm acrylic which brings me to the following thought i.e. to make own miters.
The following photo's depict the cutting of a miter on the top ( my 15 mm ply ). Then a layer ( my 6 mm acrylic ) is cut and affixed forming a T- Slot wherever needed.

.jpg)
.jpg)
Will this last? will the miter wear out? Will the sled etc run smoothly? (using slides rather than bolts)
What to make slides from? Any recommendation on the material to be used for making own slides?
Any advantage therein to also allow / make slides with own adjustment screws?
I am asking as t track and/or miters will cost me an arm and an leg ( has all to be imported).
What you say?
I want to now continue my planning and questions regarding the tops. As mentioned I plan to cover with 6 mm acrylic which brings me to the following thought i.e. to make own miters.
The following photo's depict the cutting of a miter on the top ( my 15 mm ply ). Then a layer ( my 6 mm acrylic ) is cut and affixed forming a T- Slot wherever needed.
Will this last? will the miter wear out? Will the sled etc run smoothly? (using slides rather than bolts)
What to make slides from? Any recommendation on the material to be used for making own slides?
Any advantage therein to also allow / make slides with own adjustment screws?
I am asking as t track and/or miters will cost me an arm and an leg ( has all to be imported).
What you say?
-
Suso
- Posts: 2242
- Joined: Thu Oct 22, 2015 4:51 pm
My portable workshop planning
hi Wieger,
that system will work perfect for the table saw sled. For the slider you can use a piece of trespa, or also hard wood like teak or sycamore(try to use dry wood)
To lock the sled or a featherboard you can use the same system that uses the incra brand, a very thin cut in the center of the slider(about 5cm long) where when tightening a screw, this cut opens to the sides blocking the slider.
If you are going to use screws like those from the pics to tighten from above, I am not sure that the acrylic can hold the pressure, you should do tests on a small piece.
Try to upload pics of a larger size, this way they will look better!
-
Justme
- Posts: 39
- Joined: Mon Aug 29, 2016 8:13 am
My portable workshop planning
Hi Suso,
Have you ever considered a dual rail installation to ascertain squaring the fence?
i.e. such as
.jpg)
PS,
For the portable, alignment remains an issue ( I know)
Have you ever considered a dual rail installation to ascertain squaring the fence?
i.e. such as
PS,
For the portable, alignment remains an issue ( I know)
-
Suso
- Posts: 2242
- Joined: Thu Oct 22, 2015 4:51 pm
My portable workshop planning
hi again!
this dual rail guides work very well, especially for use with the router.
this dual rail guides work very well, especially for use with the router.
-
Justme
- Posts: 39
- Joined: Mon Aug 29, 2016 8:13 am
My portable workshop planning
I found aluminium extraction and V-lock wheels.
All in all it will cost me 88€
The wheels (8) i.e. works out to be 3€ each
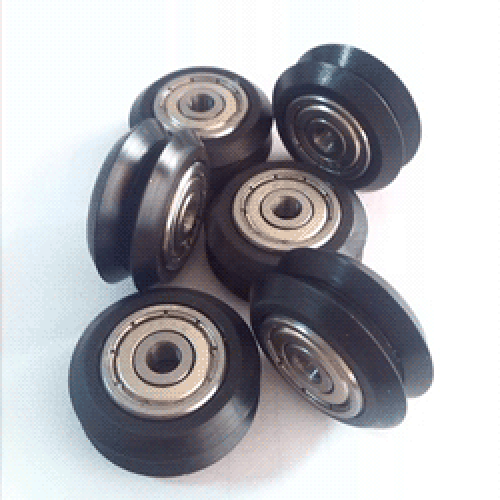
The extrusion, bracket and view of wheels attached. 66€ for what is needed
.jpg)
I am planning to install a set each end of the portable workshop and attach to it your version of the fence. ( I am planning extra length measurements (rough cuts) which I can re trim to fit the installation later.
Plan to order by the end of the month.
Trust it will work. lol
All in all it will cost me 88€
The wheels (8) i.e. works out to be 3€ each
The extrusion, bracket and view of wheels attached. 66€ for what is needed
I am planning to install a set each end of the portable workshop and attach to it your version of the fence. ( I am planning extra length measurements (rough cuts) which I can re trim to fit the installation later.
Plan to order by the end of the month.
Trust it will work. lol