Page 2 of 2
Nello's Build of Router. (with comments on process)
Posted: Mon Feb 29, 2016 2:45 pm
by Suso
Hi Nello,
Why not give it a try? If it finally does not give you power enough you'll always have time to change it.
Nello's Build of Router. (with comments on process)
Posted: Sat Mar 05, 2016 3:31 pm
by Panelli
UPDATE on drill and router
The machine is now working great. The alternate mounting plates for the drill and router was a good choice. They are very easy to change.
The 1/4" trim router has good power. Am happy with it so far.
The drill motor uses the 43 mm collar. It is a little heavy. May need to change the spring, but is OK for now.
Thanks for the great design and hours of enjoyment building.
Will start on accessories next.
Nello
Nello's Build of Router. (with comments on process)
Posted: Mon Mar 07, 2016 9:31 am
by Suso
Great job! Looking forward to see it finished!
Nello's Build of Router. (with comments on process)
Posted: Mon Mar 07, 2016 4:56 pm
by Panelli
Suso and friends,
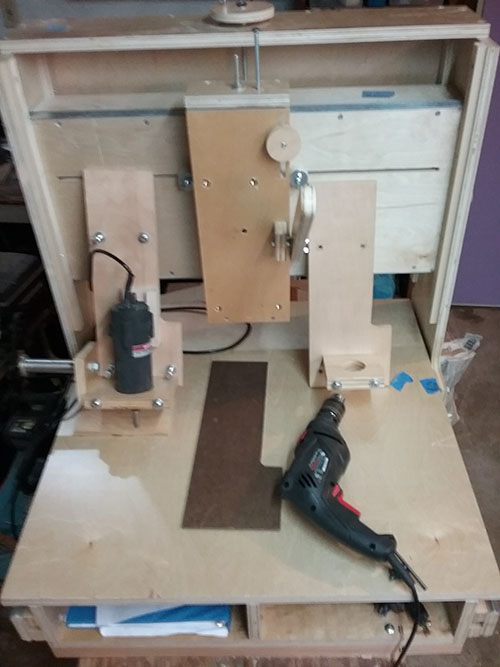
Here are photos you requested for the router and drill adapters.
Notes to photos.
-- I made a drilling template so the mounting plates and the Z plate would have the same drill pattern.
-- Used 8 mm threaded inserts in the Z plate.
-- Made two mounting plates. One with a 63 mm clamp for the router, and one with a 43 mm clamp for the drill.
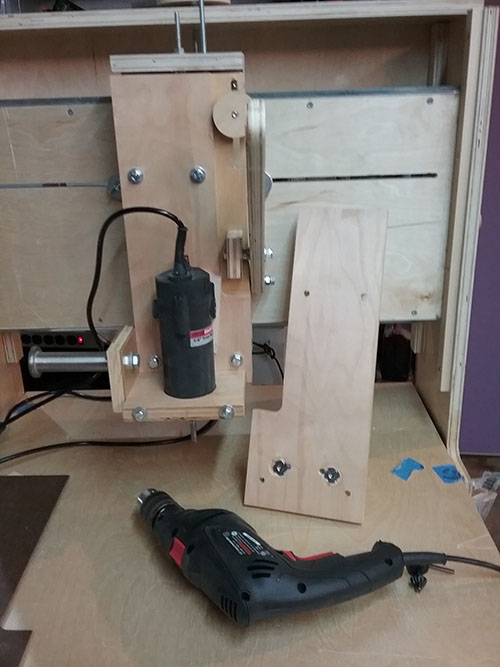
The mounting plates are 12 mm hardwood plywood. Notice that I used 6 mm Tee Nuts on the back, rather than threaded inserts. Did this to increase the clamping force of the 6 mm bolts.
The router is a 400 watt 1/4" trim router. paid $28.00 for it at Harbor Freight.
The drill has a 13 mm chuck with a 43 mm collar. pair $20.00 for it at Harbor Freight.
In tests cuts the both work great.
If anyone has any question, I will gladly answer them.
Nello
Nello's Build of Router. (with comments on process)
Posted: Tue Mar 08, 2016 9:03 am
by Suso
Hi Nello:
I struggled to understand the pics, but now I understand, it´s a good solution to easily switching tools, congratulations!
Nello's Build of Router. (with comments on process)
Posted: Tue Mar 08, 2016 2:24 pm
by Panelli
Thanks Suso,
To help clarify the photos. Basically there are two mounting plates, one for the drill and one for the router, because they have different size holes for the each tool.
The brown piece was a template for making the holes in exactly the same position.
Nello
Nello's Build of Router. (with comments on process)
Posted: Mon Mar 14, 2016 9:45 am
by Woodchuck
Congratulations Nello ! Nice JOB.
Right now I`m waiting for the router motor.I do not have a big budget too. I start the workshop in January from zero. Right now I was buying a band sanding machine, a electric planer etc. Mine router is done but still no time for polishing and painting. Meanwhile I start to build the workbench and I`m near close. Nice Idea for the accessories.
Good luck and God Speed !
Dorel
Nello's Build of Router. (with comments on process)
Posted: Mon Mar 14, 2016 2:09 pm
by Panelli
Dorel, Thank You. I have very little time to work on the router. It is providing many happy moments. Keep me informed of your progress.
Nello