Hi guys,
first post, but having just completed my build of the 3D Router, I thought I'd say hi and just how much I enjoyed building this thing. Well worth the effort. I just need to sort out a more permanent method of workpiece clamping and dust extraction - which are the jobs for today - and we're all set.
Suso, your plans are excellent. I had toyed with the idea of building something like this for some time, but never really knew if it was viable. I owned a hobby cnc router previously, but found it too fiddly to set up for each job and so sold it. Finding your plans convinced me that this kind of routing machine could work and your plans gave me that 'kick' to finally make a move.
I'll hopefully upload some pics tonight or the next couple of days or so when I get myself organised.
I tailored the machine somewhat for my needs. Not needing the drill press or sanding facilities, I modified the design to dispense with the vertically adjustable gantry which simplified matters somewhat. Also, my machine is 1500cm long, 700cm wide. I also, cut t-slots to house the quick-stops rather than cut grooves all the way through the stock. Otherwise, I followed Suso's design to the letter.
I initially used aluminium angle for the rails which was a BIG mistake. I only used it because it was simple to source. Ended up stripping the whole machine down and switching the aluminium for 1.5mm thick steel angle. Should have used steel from the outset! Much much better. Movement is so much smoother now.
Thinking about building a second one for the workshop!
Upload some piccies later.
Regards.
Stephen.
Hello and... build complete!
-
Suso
- Posts: 2242
- Joined: Thu Oct 22, 2015 4:51 pm
Re: Hello and... build complete!
Hello Stephen!
thanks for your kind words, seems that you have made some interesting changes. I'm looking forward to seeing those photos!
thanks for your kind words, seems that you have made some interesting changes. I'm looking forward to seeing those photos!
-
seesaw
- Posts: 2
- Joined: Thu May 10, 2018 7:26 am
Re: Hello and... build complete!
Hi Suso,
I took some pictures, but the damn light was poor in all but one of the photos. I'll try and get some more tomorrow. For now just the one unspoilt photo.
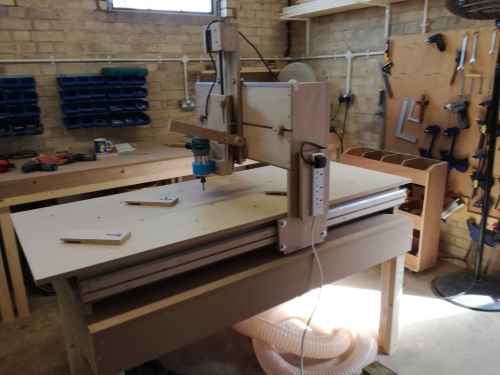
I used the machine for the first time today and used it to make the clamps you can see fixed to the spoil-board. These pivot and rotate and slot into any of the various insert nuts I have drilled in to the spoil-board. They work very well.
The machine was a delight to use and, first impressions, seems very accurate. I have added dust extraction, but didn't get any photos.
In case you're wondering why my z-axis back plate is so high, I ended up using a 500mm long spring (actually a plumbers pipe bending spring) as all the others I sourced I didn't like. The pipe bending spring works really well. The tall z-plate has turned out very useful for securing the dust extractor hose to as well!
Machine working area is about 123cm x 45cm which is perfect for my needs.
Very happy.
I took some pictures, but the damn light was poor in all but one of the photos. I'll try and get some more tomorrow. For now just the one unspoilt photo.
I used the machine for the first time today and used it to make the clamps you can see fixed to the spoil-board. These pivot and rotate and slot into any of the various insert nuts I have drilled in to the spoil-board. They work very well.
The machine was a delight to use and, first impressions, seems very accurate. I have added dust extraction, but didn't get any photos.
In case you're wondering why my z-axis back plate is so high, I ended up using a 500mm long spring (actually a plumbers pipe bending spring) as all the others I sourced I didn't like. The pipe bending spring works really well. The tall z-plate has turned out very useful for securing the dust extractor hose to as well!
Machine working area is about 123cm x 45cm which is perfect for my needs.
Very happy.