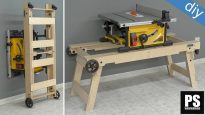
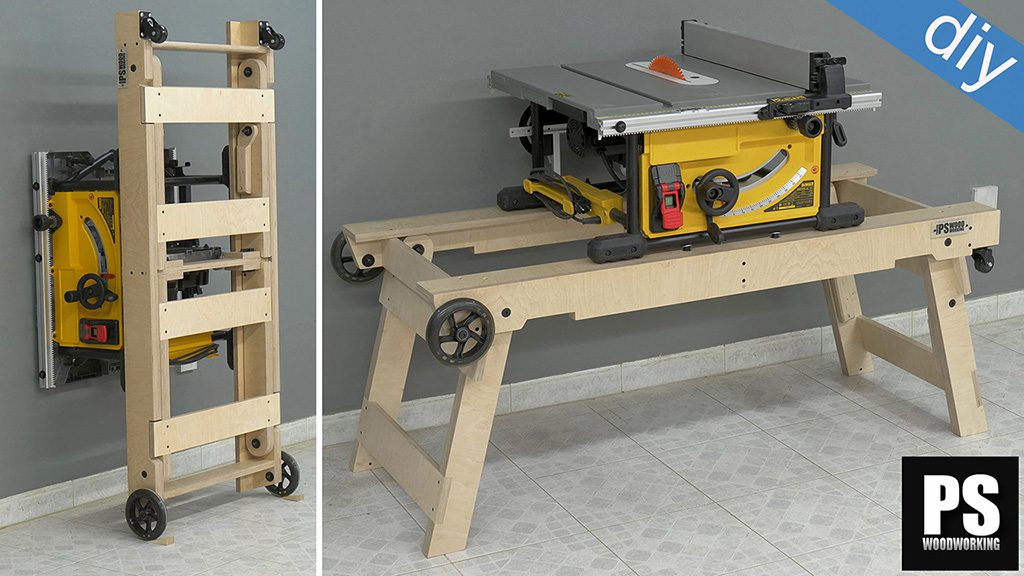
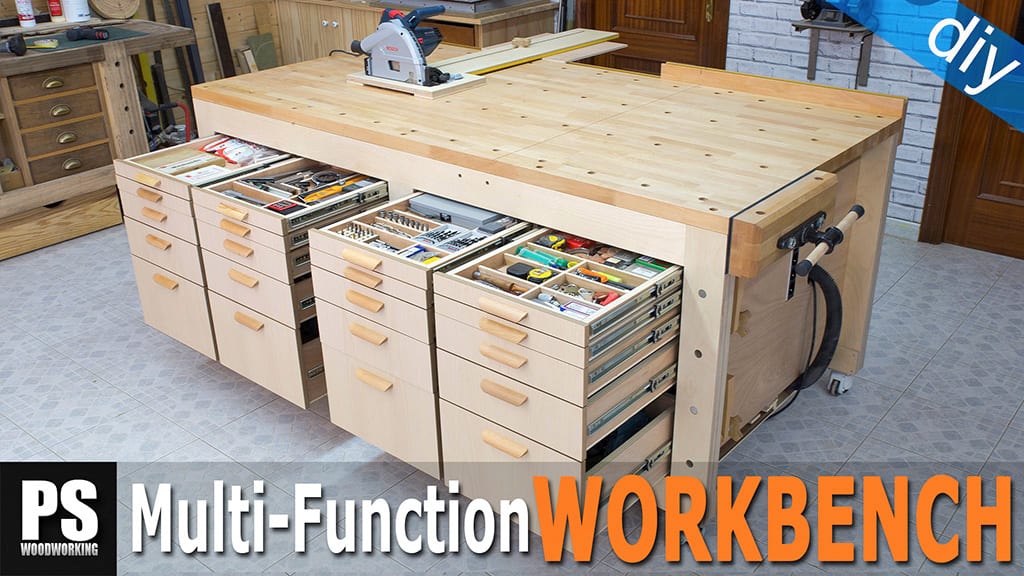
Almost four years ago I made this DIY multi-function workbench, and since then I’ve made some improvements in it which I’d like to show you in this new video. I’ll also use this opportunity to install a new hinged bracket for my plunge saw’s aluminum guide.
Plans and modifications in the homemade workbench:
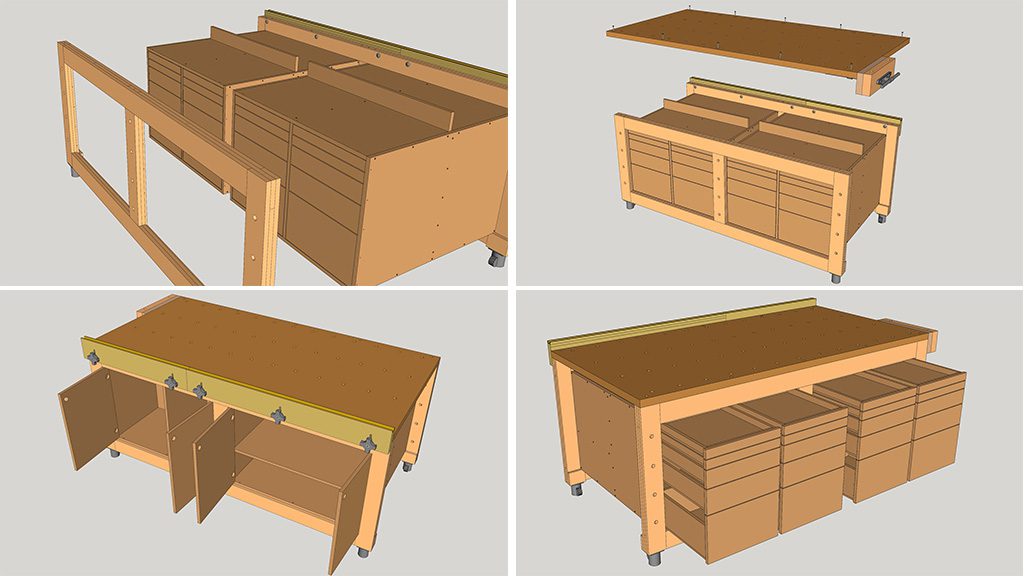
This is a photo of the 3D Sketchup model included in the workbench plans, available on my website. I used a construction-by-addition method to make the frames, which hold the two cabinets.
The benchtop rests upon the frames. This system makes cutting the required parts and putting them together easier, and you can also disassemble it to do maintenance, or transport it when moving.
Approximate weight: 220kg (without storage)
Overall dimensions: 900mm high, 2000mm width and 1038mm depth.
DIY Workbench Plans
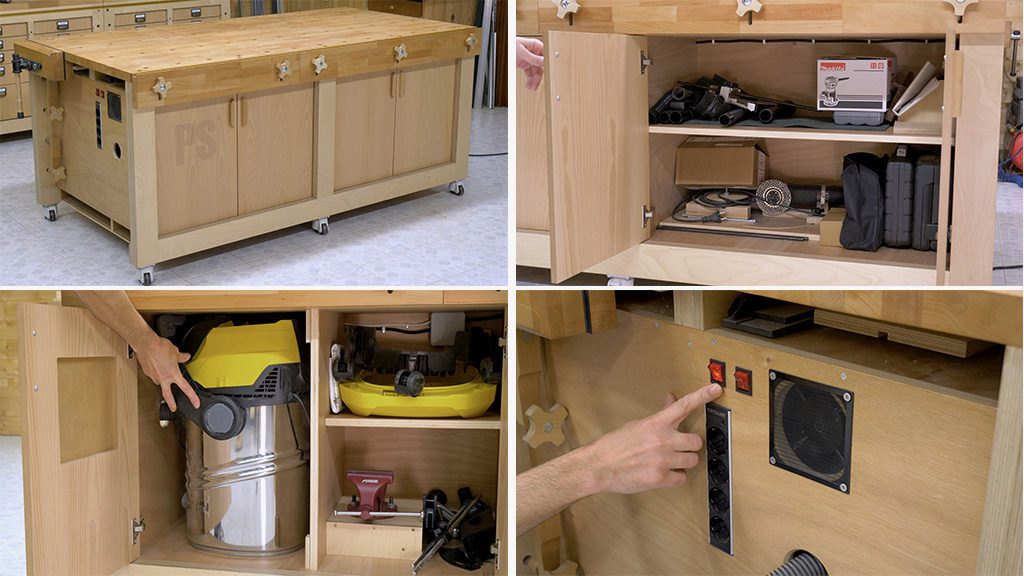
Before installing the guide rail bracket for the track saw, I’m going to give you a brief summary of some of the modifications I made in the workbench. In the backside I’ve installed four doors to store all kinds of accessories.
In the gap further right I’ve installed a vacuum which I can activate with a switch. I’ve installed a second switch for a fan to prevent the vacuum from getting too hot while in operation.
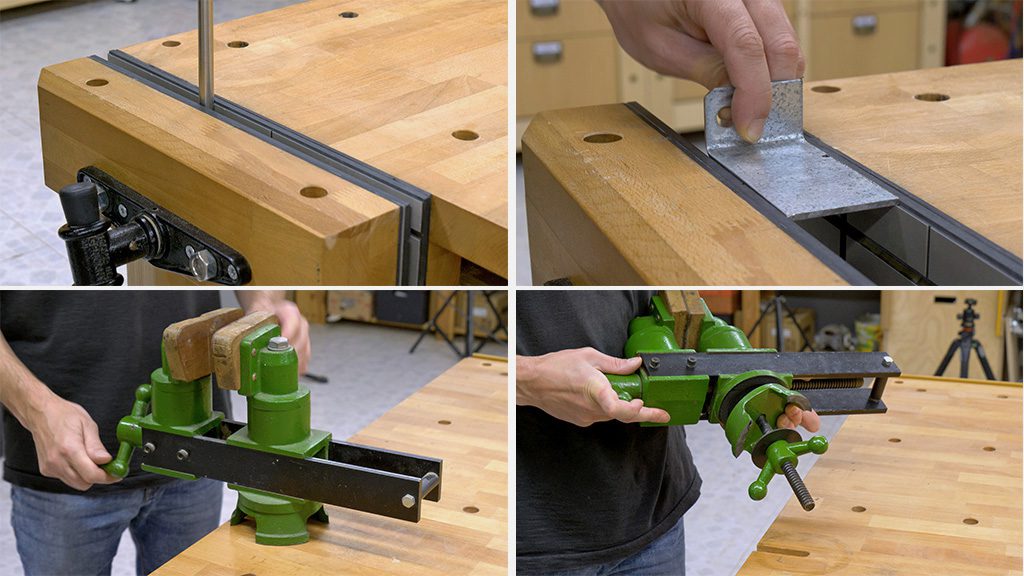
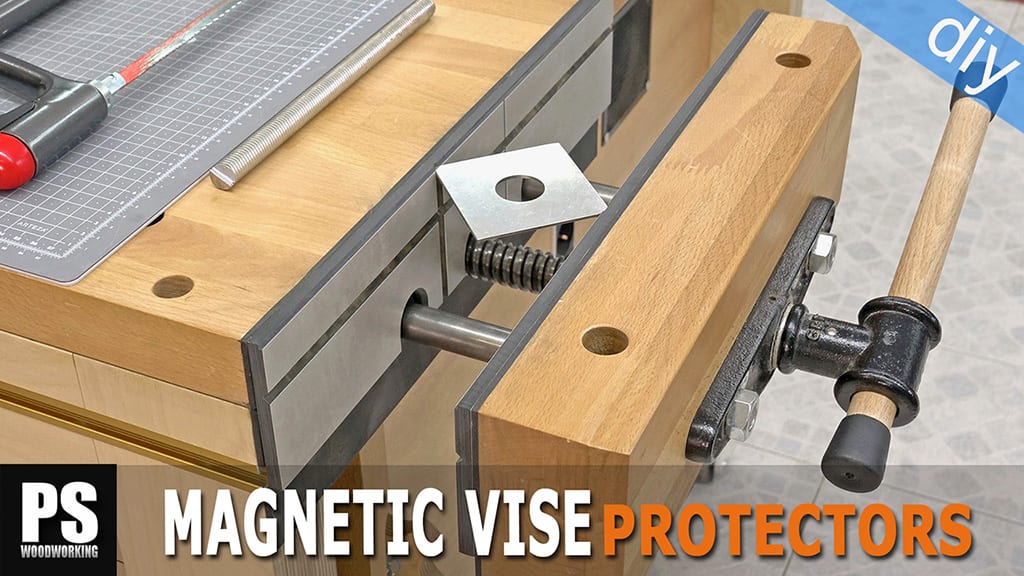
Every good workbench should have a vise, which in mine it’s on the right side. A few months ago I built some versatile magnetic protectors to work with metals and pipes without damaging the vise jaws.
On the left end I’ve placed an adjustable luthier vise. It’s a very versatile tool, not just for luthier work. I cut a channel in the benchtop so I can remove easily when I don’t need to use it.
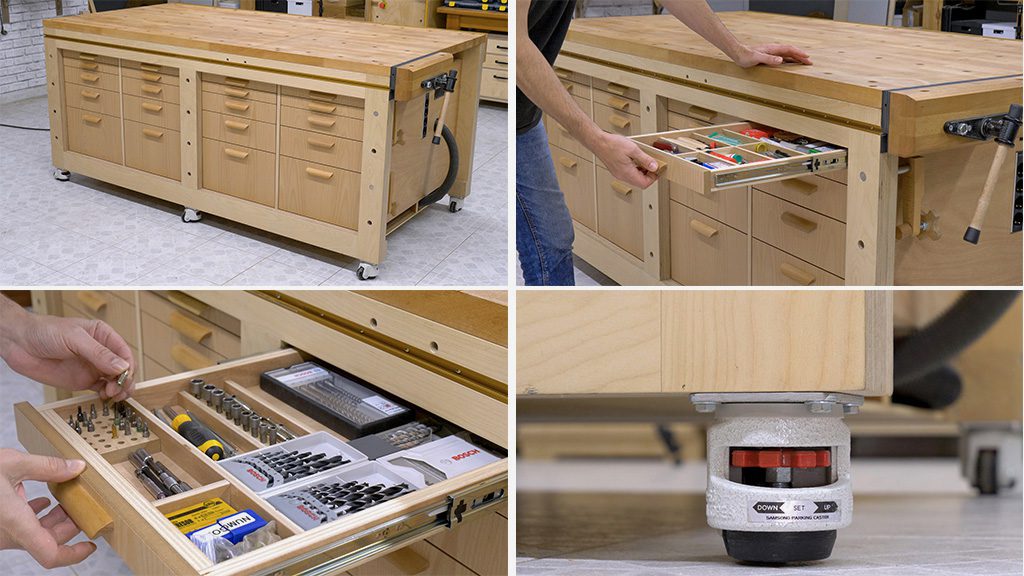
This is the front of the bench. I’ve installed 20 drawers of different heights so I can store all kinds of tools and accessories and keep them on hand. In the left drawers, close to the luthier vise, I’ve stored all the tools I need to repair musical instruments.
Back then, I installed four retractable wheels whose height can be adjusted with a homemade wrench. This kind of wheels allow me to lock the bench in place as well as level it. Months after finishing the workbench, I installed two more wheels in the middle of each frame. I’m not sure these are necessary, but the bench does weigh quite a bit considering its full storage capacity.

Another modification I did was installing a T-track profile in the front frame of the bench. Along with its clamps, it lets me secure workpieces on the front of the bench or attach all kinds of accessories.
This system is perfect for these kinds of operations because the clamps are kept in their open position, which makes placing and removing pieces easier. I can use the DIY holdfast clamps both in the front holes of the frame and in the benchtop to hold down all kinds of workpieces.
I’ve also bought some iron holdfast clamps which work similarly, although these are a little faster and more convenient to use, making them perfect for repetitive jobs, for example.
In order to make the benchtop, I used beech finger joint board, but any other kind of board would do, such as MDF or plywood at least 35mm thick so that you can use the holdfast clamps. You can also join two boards together to reach the required thickness.
In the benchtop and vise jaw holes I can insert bench dogs to hold longer workpieces in order to, for example, smooth down their surfaces with a hand plane. All of these accessories are perfect for using in any other worktable, like my modular workbench.
How to use the workbench cutting station:
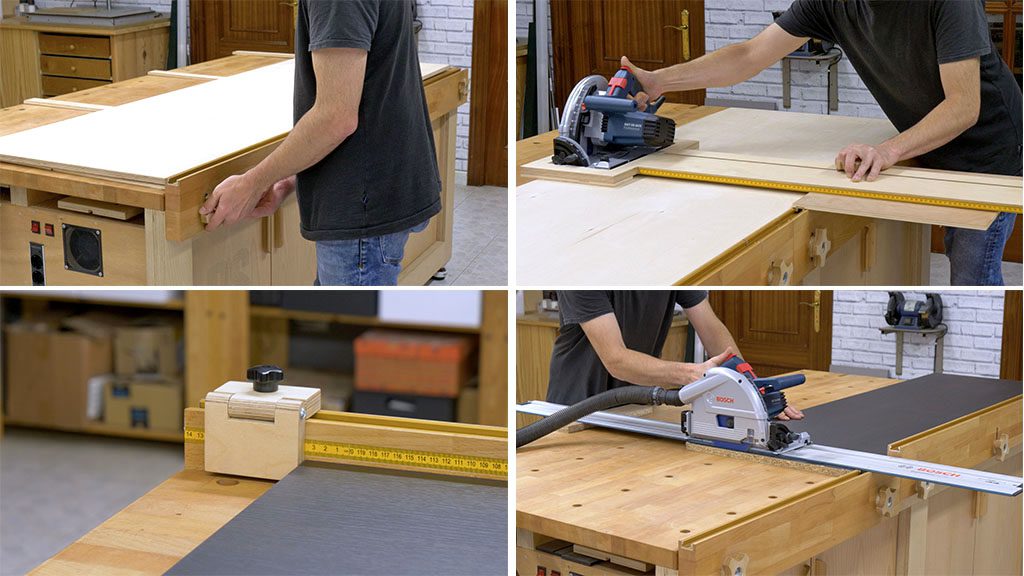
Now I’ll show you how to use the workbench cutting station. I’ve installed two wooden guides in the back of the bench, which I can raise or lower depending on the type of cut. First off, I’ll showcase how to use the DIY rip cut guide. In order to use it I have to place some wooden strips to act as protectors to avoid damaging the benchtop. I’ll put on top of them the board I’m going to cut, and then raise the wooden guides until they’re level with the board.
I’ve stored the rip cut guide in the gap under the benchtop so I can keep it on hand at all times. There’s a piece of aluminum on the underside which goes into the miter channel of the wooden guides to achieve the movement necessary to make cuts. I insert the track saw into the rip cut guide and adjust it in accordance with the required cut measurements. Now, with both hands, I move the rip cut guide and the saw to cut the board. It’s a very convenient system for parallel cuts in relatively big boards.
Finally, I’ll showcase the cross cut system. To do that, I use the plunge saw and its aluminum guide rail. I’ve screwed a piece of HPL panel to the bottom of the rail, which is inserted in the wooden guides’ miter channel. In this case, I must raise the longer wooden guide on the right side to its maximum height and the shorter one must be left at the same height as the workpiece I’m going to cut.
Back in the day, I made a stop for the front of the bench to ensure cuts are square. I also made miter track stops for the wooden guides’ miter channel and to perform custom repetitive cuts. As you can see, the system is a bit complicated to use. Among other inconveniences, I have to remove the guide rail after each cut, so I thought I should improve it.
How to install the guide rail bracket:
Here’s the guide rail bracket box sent to me by Dashboard so I could test it. I’m going to assemble the system parts without going into every step, as in Dashboard’s website you’ll find some great videos which I’m also going to follow so I can get it done more quickly. The assembly is easy and takes around 15 minutes.
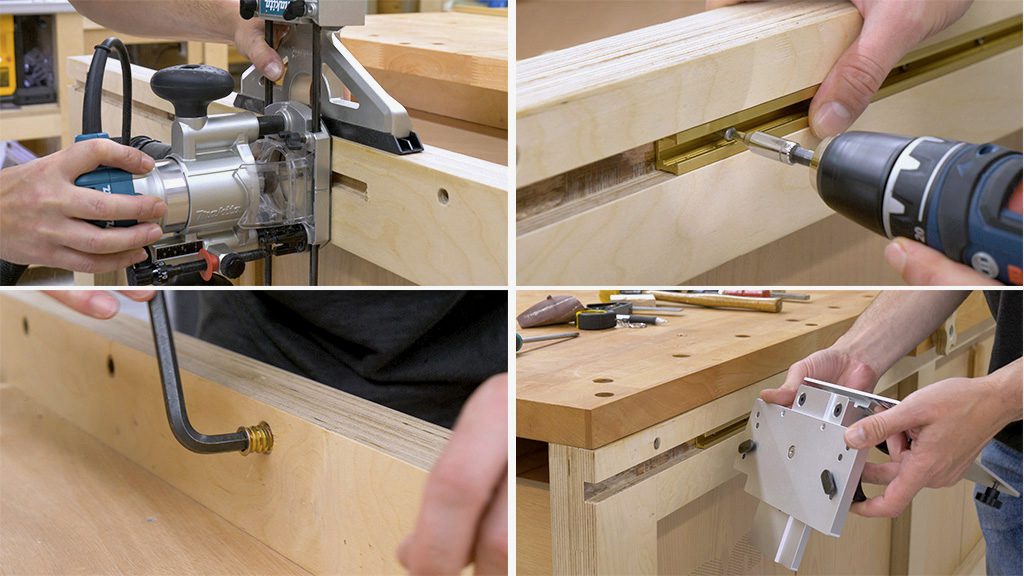
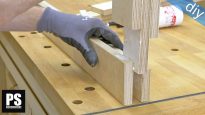
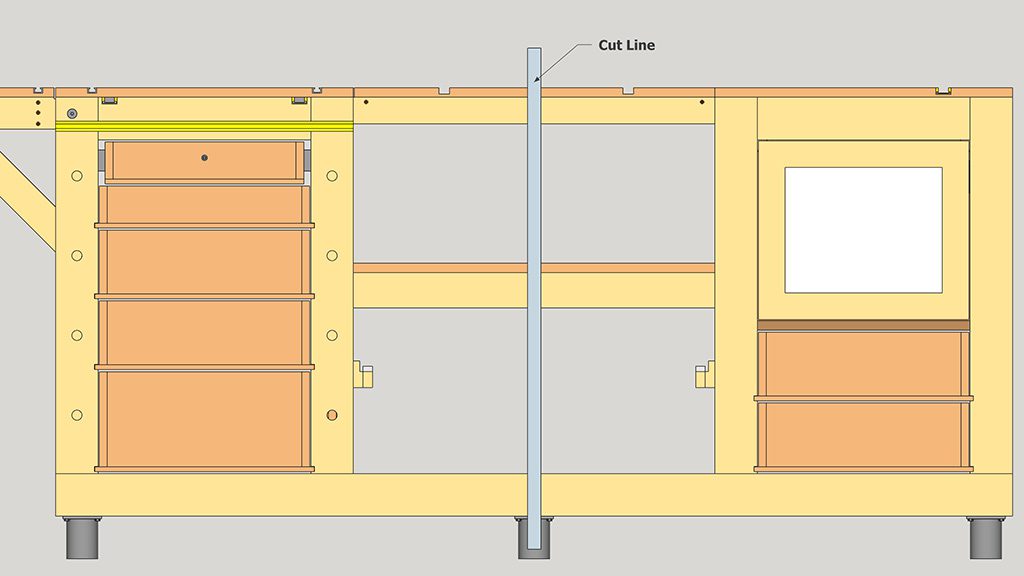
It’s time to install the guide rail bracket on the workbench. I’m going to remove the shorter wooden guide and mount the bracket on the saw guide rail. To do this, I must insert the bracket in some grooves on the underside of the guiderail and tighten some knobs. Now I remove the longer wooden guide, as well as the benchtop, so I can cut a groove for the T-track profile. After figuring out the exact position for the profile, I cut the groove in several runs with a handheld router. Then I screw the T-track profile to the back frame.
I also have to make a new hole in the frame for this threaded insert which will allow me to secure the shorter wooden guide in its new emplacement. I’ll use a piece of wood as a guide to obtain a square hole. One the insert has been placed, I screw on the benchtop and for the first time I’ll try to insert the guide rail bracket in the T-track profile.
Another option to install the guide rail bracket would be to cut the shorter wooden guide, but if I did that, I wouldn’t be able to continue using the workbench with the rip cut guide, and apart from that, by not cutting the shorter wooden guide I’ve got a longer support surface on the right side of the cut.
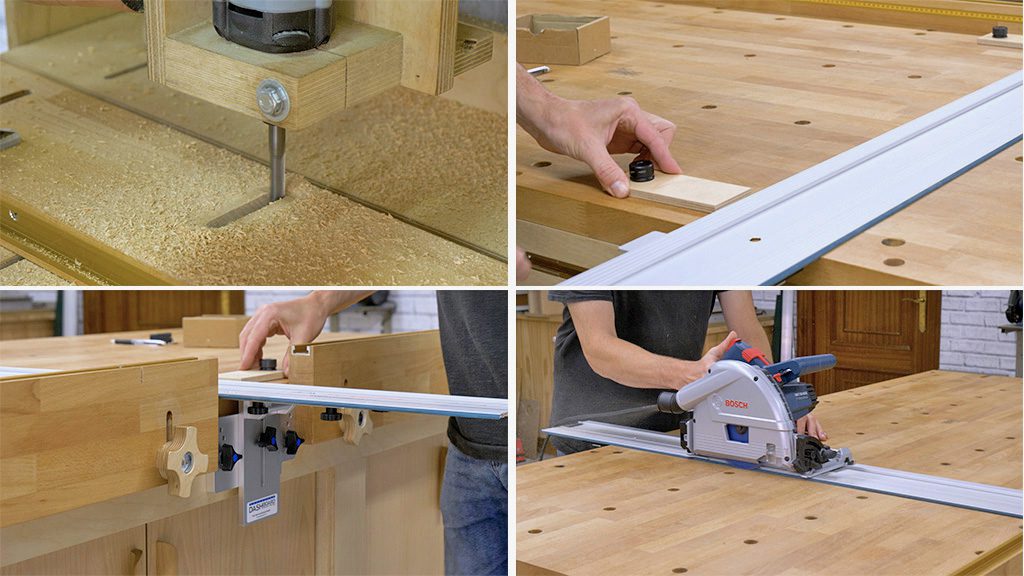
I mark the position to cut a new channel for adjusting the height of the shorter wooden guide. I’ll do several runs with the 3D router. I make sure everything worked as intended by placing the wooden guide on the bench frame.
All that’s left is to install the front of the guide rail bracket on the front frame. This piece allows me to achieve square cuts and keep the plunge saw guide fixed on the benchtop. I have to screw on another small piece to the underside of the aluminum guide; this piece is inserted into a pin in the front guide rail bracket.
The guide rail bracket comes with some bench dogs that are inserted in the benchtop holes which help square the saw aluminum guide. In my case, I have to make a small modification. I’m going to cut two pieces of plywood to give some extra length to these bench dogs.
After cutting them and drilling them with the drill press, I make sure everything is correct. These is a fairly clever system, you only need to loosen the two parts of the guide rail bracket, move the aluminum guide up to the bench dogs, and at that moment, tighten the two guide rail bracket parts again.
I’m also going to mark the cutting line on the benchtop, using a blade at a depth of 2 mm. The benchtop now has two cutting lines, the one I’ve been using up to this point and the new one.
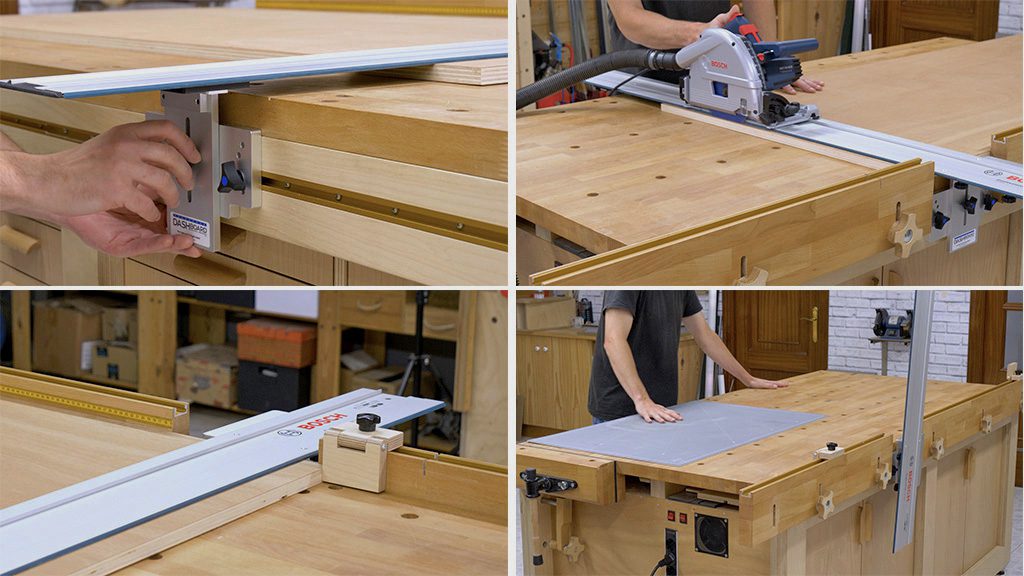
I’m going to do some tests to make sure everything is working as intended and I can make square cuts. If that’s not the case, it will be an easy thing to correct by modifying the plywood pieces that act as bench dogs. I’m going to test it by making some cuts on this plywood strip.
First I must adjust the height of the guide rail bracket. I make the cut and right after that, I turn the piece to see if it matches the cutting line, and that seems to be the case. To do this check correctly, the plywood strip has to be perfectly parallel.
I’m going to make some more cuts using the homemade miter track stops. First, to the right of the cut, then to the left. These stops are perfect for making repetitive cuts on the bench. With this cutting station I can cut pieces up to 100 cm deep and about 140 cm long.
The other great advantage of using this kind of hinged guide rail bracket is that once I lift the aluminum guide, I can use the workbench normally again.
Removing the cutting system again is very simple and easy. You only need to loosen the back bracket knobs to remove the rail, remove the shorter wooden guide in order to take out the bracket and do the same with the front bracket.


It’s a delight watching your videos. I have brought the plans to make it, but not yet started working on it. What I like in your videos is the clarity of purpose and precision.
thanks mate!
This bench is amazing and clever! I want one so bad! Question on that side t-track and clamps. It looks like typical t track but what clamp are you using to fit in them?
thanks Ronald! check this out:
Love this bench, especially the “overhang” at the short edges. I have a similar solution myself but I see now that I can have a bigger overhang. Also got a few other ideas to include from your video as well, thanks 😀
thanks Jan!
Hello. Do you ever sit in front of a bench, while doing something on it? I just wonder if it would be comfortable, because the top is even with the sides, which does not leave much space for the legs. And some things require sitting.
Nice bench, downloaded the plans and was wondering if the sawblade thickness was taken into account ?
hi Vinnie, Yes, I have taken that into account