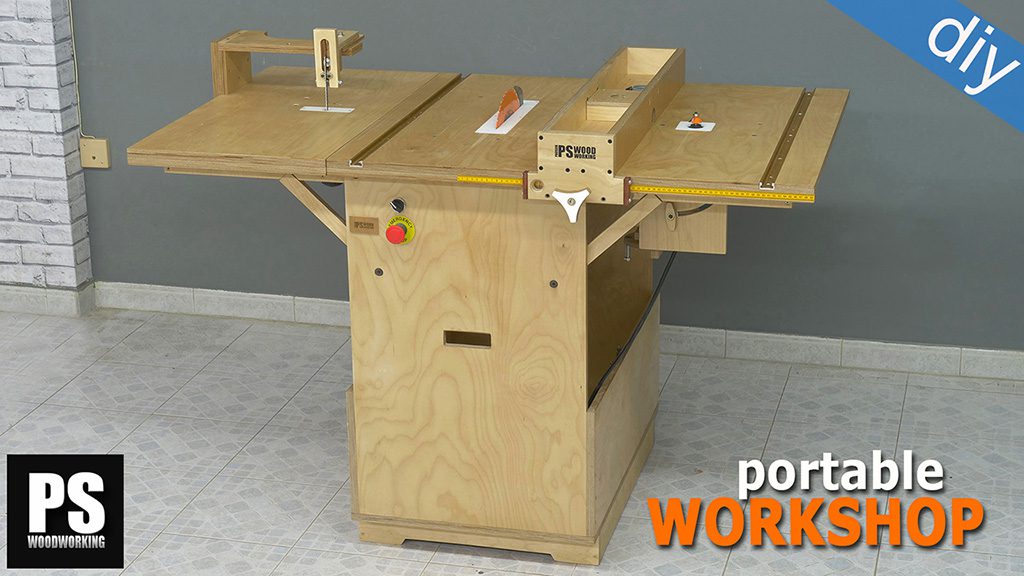
A Portable Workshop for those of you that don’t have much space or a compact cabinet where you can carry all your stuff to work in other locations.
It’s fitted with wheels so it can be moved by only one person and you can even put it in your car for transport; though this will require a little help, of course. I tried to use common tools and cheap, easy-to-find materials.
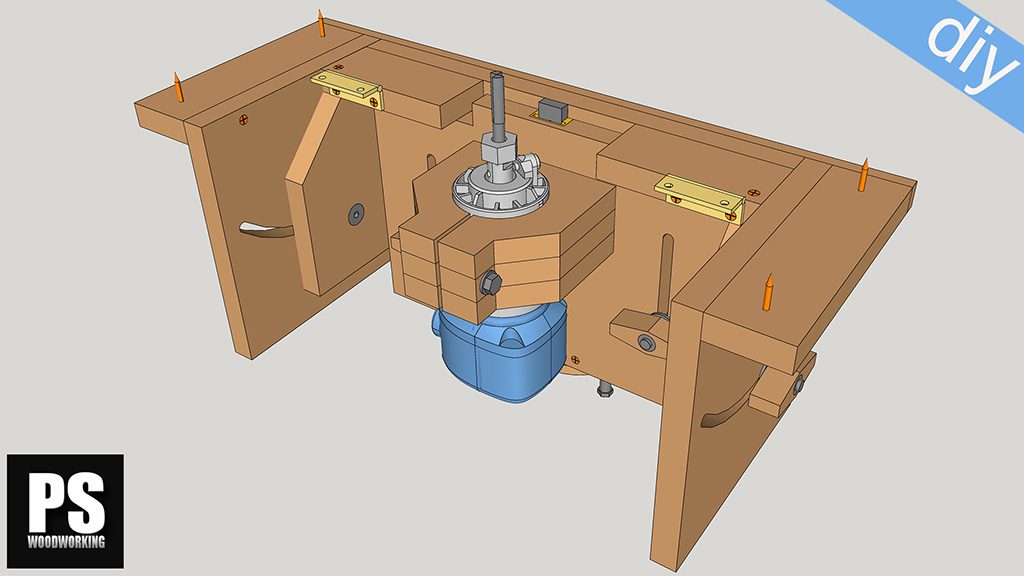
This is the 3D model of SketchUp included in the plans that you will find on my website. If you are interested in collaborating with my web or building your own Portable Workshop, here you’ll find the plans:
Portable Workshop Plans

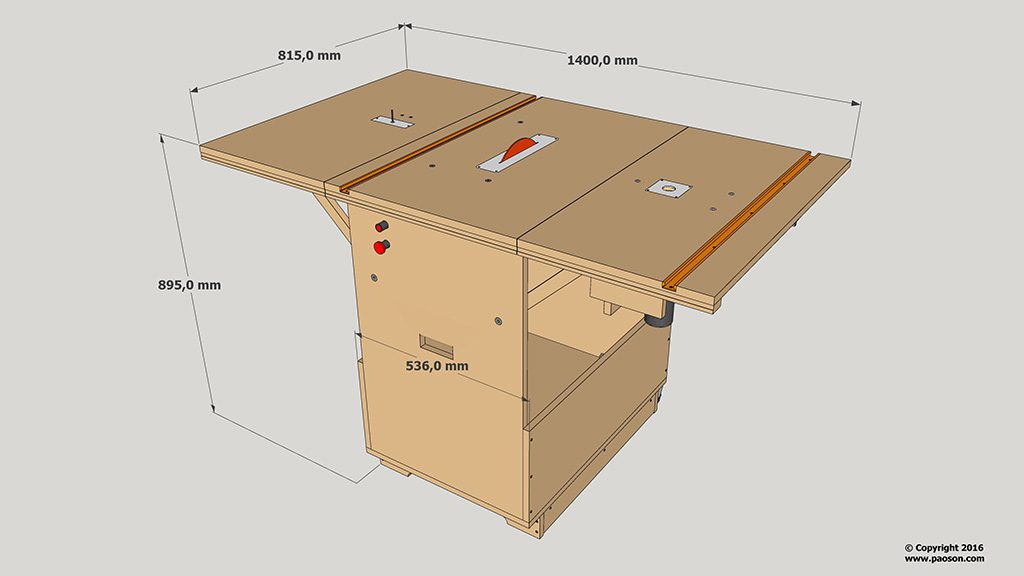
As you can see it has 3 functions: saw table, router table and inverted jig saw. Also, it has a big cabinet you can use to carry some of your tools with you. It’s equipped with a lock to discourage thieves and keep children safe.
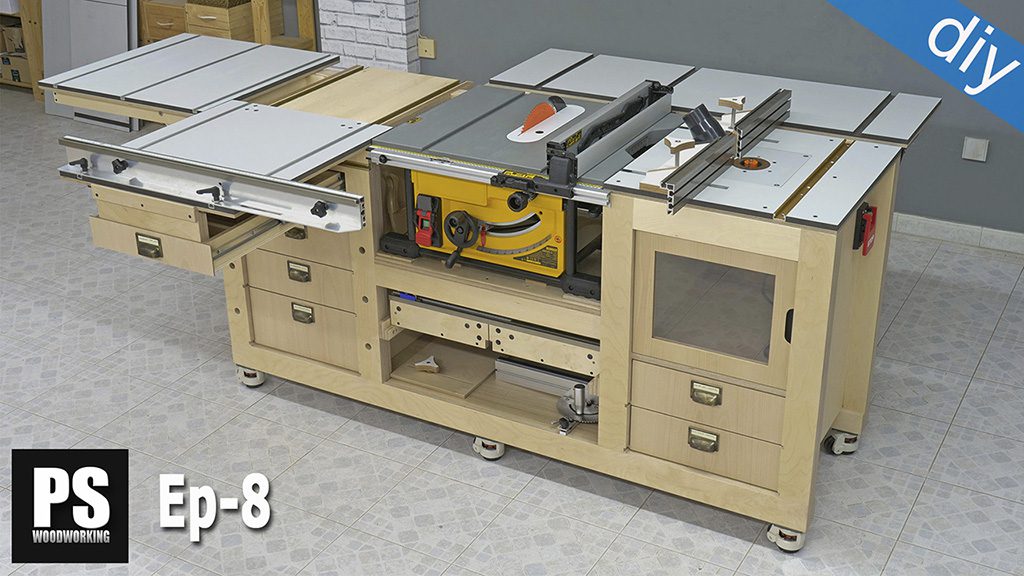
In order to achieve optimal results, quality tools are required. Cheap tools can do the job too, but the more you spend here, the better the results will be. You’ll be able to keep using them in other projects as you can easily remove them and assemble them back again.

These plans are for a router or drill with a european neck(43mm) circular saw Makita 5903r and a jig saw Festool PSB 300 EQ. To install other models, you may have to modify the plans a bit.
Dimensions Closed: 900mm high, 540mm width and 815mm depth.
Dimensions Open: 900mm high, 1400mm width and 815mm depth.
Total aprox weight: 55kg
To show you how it works, I am going to build a pair of drawers with cheap pine floorboard.
First I’ll cut the parts for the drawers with the table sled. Then I’ll use the fence to get the desired drawer height and make the groove for the base. With this machine you can make angle cuts easily using the miter gauge, and removing the quick access covers you can tilt the disk, 45 degrees in this case.
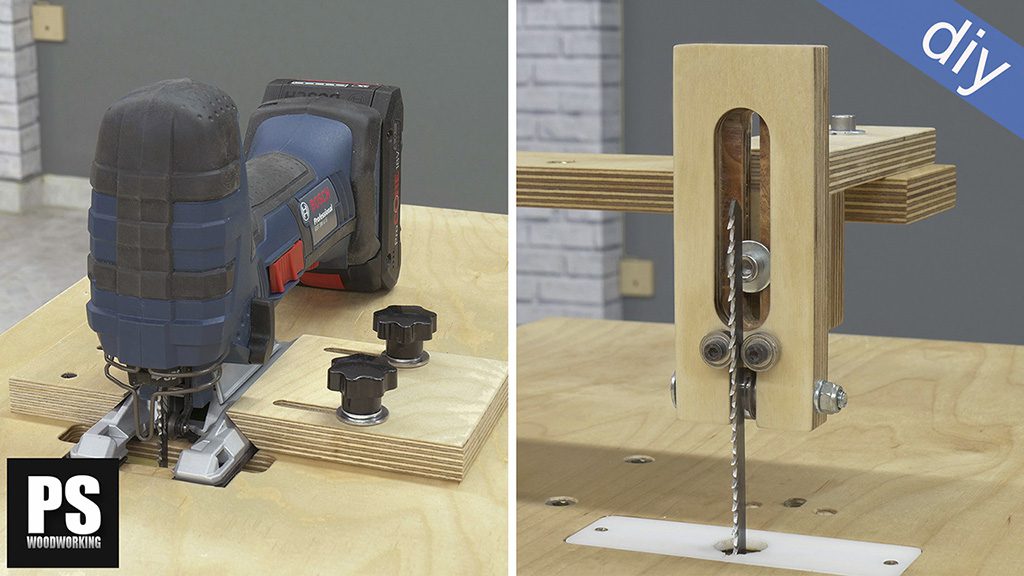
The jig saw guide is adjustable in 3 axes and we can use different blade sizes. From one hundred to one hundred and eighty millimeters, getting a maximum cutting height of seventy milimeters.
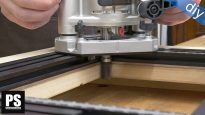
Now I’ll make the drawer handle with the milling function. I am changing the router bit in order to get rounded corners. We also have a miter channel here to use the miter gauge.
I have also developed a system for a follower bearing that will be useful to make curved millings. We can also tilt the router 45º to cut the drawers.
The drawer is finished so I am going to put it in place. With this machine you have two different ways of making tenons. First with the jig saw, the fence and the miter gauge. And the second one with the disk and the tenon jig.
With the biggest disk I can mount in my circular saw (235mm) I get a max cutting height of 70mm. The incra miter chanel has small adjustment bolts to reduce tilt. You can even lock it if you need to.
I have also developed a system to make the box joints easily. You must place half of the pieces on the one side and the other two on the other side. To close the portable workshop, we must lift up the circular saw and tilt the router 45º.
Making a Portable Workshop: Ep1
Now let’s take a look at how I made it. Let’s start cutting the parts following the cutting list and mark them all with their reference numbers. Then I’ll drill in four spots for the handle and cut a hole with the jig saw.
Then I’ll drill a hole with the same depth as the thickness of the washer for the opening system, and countersink the drill holes. Now I will machine the recess for the power and emergency switches.
Now you can start assembling the cabinet using 50mm screws and dowels. You can also, if you wish, apply a coat of lacquer for a better finish and durability.
Then I’ll cut the 3 top parts and drill the frames for the hinged covers. Also, I’ll make the holes for the steel pipe so it fits snuggly, as it is the axis of rotation of the hinged covers.
I made the milling for the circular saw with the 3D router. If you don’t have a similar tool, you can do it with the manual router using guides or templates.
Then I’ll make a milling on the top for the quick access covers, which will make easier to change the disk. You can use the cover itself to calibrate the depth of the milling. I’ll try the circular saw to the top of the table and mark holes.
The 3D Router comes in very handy here, as the column drill won’t work because of its reduced work space.
Making a Portable Workshop: Ep2
Now, onto part two of our home made Portable Workshop series. I’ll mark the place for the miter channel following the plans and make a groove cut with the circular saw. These two pieces of plywood will give us extra thickness to screw the miter channel.
I’ll make a rabbet with the depth of the self adhesive measuring tape. Then screw the piece into the cover and make the hole for the router. Cut the pipe and assemble the frames for the hinged covers.
Prepare the stoppers and assemble them according to the plans. Put the cover of the router in place and screw it to the frame using the the miter channel holes.
Mill the cover and make the inner rabbet to place the jig saw. If you are not using a sliding surface as melamine, you should apply a coat of lacquer and sand it before and after.
Cut and machine the parts for the vertical router holder. Mill the hole for the height adjustment of the vertical router. Then glue two plywood parts together to build the spindle mount.
You should use a drill with the exact diameter or an adjustable one like this when building the router holder. Also you can make it on a CNC or even buy it online.
After assembling the spindle mount in the holder, we can try the lift system. Assemble the hinges provisionally to mark the turning radius. I’ll use leftover pieces of plywood to make the wooden knobs.
Making a Portable Workshop: Ep3
I will start this video with these parts I forgot to assemble in the last video. They will make the lift system more stable. Then I’ll cut the parts for the base in my homemade saw table.
Assemble it and screw it to the bottom of the cabinet. It should have the same size as the wheels you’ve chosen. I’ve placed a barrel bolt on one of the hinged covers and a door lock on the other. They can be useful when transporting the workshop and to discourage stealing.
Prepare the electrical installation consisting of a power strip with four sockets: one for the router, one for the jig saw; and the remaining two sockets will be useful for connecting other portable tools. The socket for the circular saw has an on/off switch and an emergency stop button.
I’ll use the opportunity to install the cord winding mechanism. I made these quick access covers with opal methacrylate. Place them and try the circular saw. Using a metal bracket, I have adapted a bearing follower from an old router. It can be very useful for curve millings.
Finally we check whether the hinged covers are aligned with the top of the table. If not, it’s easy to correct the tilt adjusting the stoppers. Insert a steel pipe in the router to check the alignment in all directions.
Also check the alignment of the disk and make sure it is parallel to the miter channel. Do the same with the jig saw and finally check whether it closes properly and does not touch the tools inside.
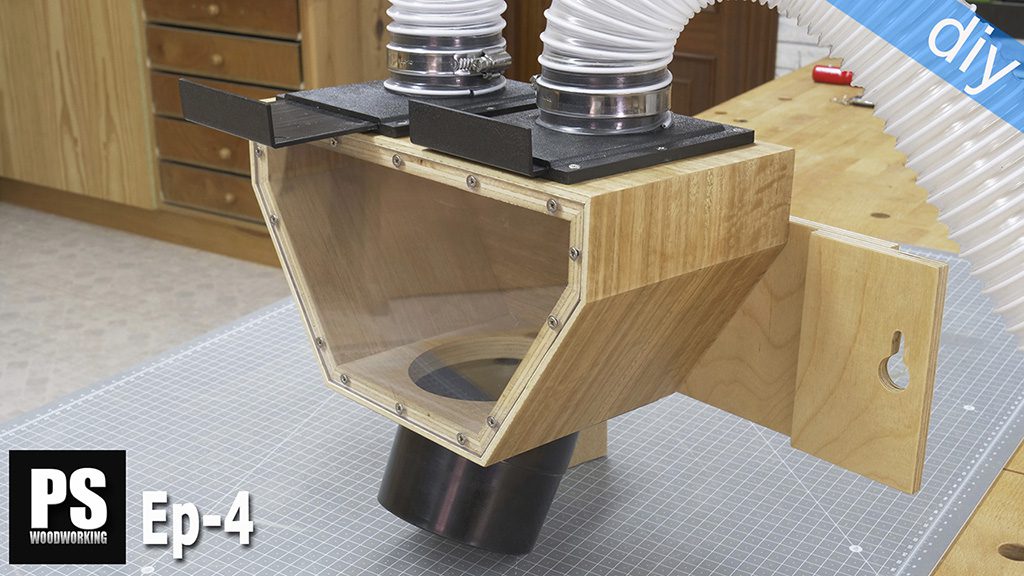
Making a Portable Workshop: Ep4
In this fourth video I’ll make some accessories for the Portable Workshop. Let’s start cutting the parts for the sled. I’ll make a channel to center the miter slider.
Screw two pieces of plywood avoiding the areas the disc will move through.
Groove the place for the measuring tape. Apply lacquer before and after sanding to achieve a sliding surface.
Assemble the sled, put it on the miter channel and cut the remaining part. Turn it and make a cut in the middle.
Stick the measuring tape in place. Disassemble the holder of the sled and make a channel for the box joint jig like the one on my old table saw.
Adjust the slider channel until fits tightly enough with these two bolts. You can even lock it by tightening the screw completely.
Cut the pieces for the fence. Assemble, lacquer and sand it. Then I’ll make the tightening system for the fence. Glue a couple of dowels that we will use as a guide.
Assemble the knob and try the fence. Then I’ll make the router dust collector. Put the threaded inserts to lock the featherboard on the table.
Make sure the disk is parallel to the fence and stick the measuring tape in its groove. Prepare the pieces to make the the box joint jig template. Finally apply glue and sand it.
Making a Portable Workshop: Ep5
This is the last video of this how I did it tutorial. First I’ll build the miter gauge. You can glue the printable templates of the plans onto the plywood or use a ruler. You can already cut it in the machine.
The incra miter slider threads are in inches. If you prefer to use metric you can use a metric tap like I will.
Try it to make sure the turning radius is correct. Then I’ll cut the parts for the tenon jig. You can increase the thickness if you need reduce friction.
Glue the printable templates onto the plywood to make the featherboards. Make the adjustment slots in the router, then screw the threaded inserts.
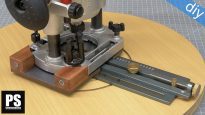
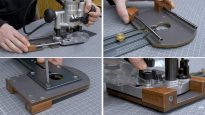
Let’s start making the guide for the jig saw. The tightening system is the same as the one used in the fence. Assemble the bearing adjustment system.
Use a metal plate to prevent the blade from wearing out the plywood. With the drill make one of the holes bigger to allow the adjustment of the bearing.
Do the same with the plywood sheet. Machine the height adjustment system. Now we can move it on three axes to place it in the exact position we need.
Now I am going to check if it works making my new push stick. It is important to hold the piece you are cutting with both hands to keep it in place when you use the inverted jig saw.

I just bought your plans, can’t wait to start building the workshop 🙂
Hi, I would like to know what brand of Router you have used on your Portable Workshop and a model, so I can match it the best I can as I am in Australia and it is very difficult to find a Router with a 43mm collar, I have only been able to find Routers with a 63.5mm collar without having to order a unit online to get one with a 43mm collar. Thanks
hi Fergal, here are some of the 43mm clamping collar routers that I know:
Your portable workshop is great. I would like to get/purchase SketchUp plans for your box joint jig if they are available. I’m about to try and make it by estimating what I see in the video, but I’d be more than happy to pay for actual plans if they were available.Thank you.
Hi Love your work 🙂 When is the portable workshop going to be available in your shop?Regards Jan
Thanks Jan, you can download all my plans here:
Very well done! Excellent workmanship! Will be PERFECT for my tiny home shop. Quick question, if you please, to your knowledge, has anyone converted your design for use with Imperial units (inches)?
I live in the USA and access to metic-based lumber is difficult to say the least! I can do the conversions myself, but why repeat the work which may already be completed? Thank you!
hello mate! here you’ll find more info:
Hi,I would like to get an idea on how much the material of this would cost. Could you tell me how thick your plywood is? What was the total material cost for you? Before buying the plans I would like to have an idea what I’m getting into.
I also have very few tools, could you tell me what tools I definitely need? I’m guessing a circular saw, a drill and a plunge router will do if I’m creative?!
Hello Jonathan, please check out this article:
Hi…Your Workshop Portable is amazing…is possible download the project?
Did you ever release the plans for this?
hello, I can not find or click to download free plans at first
hello, check this out: